- Offensive Techniques & Strategies


The Case for the Defense
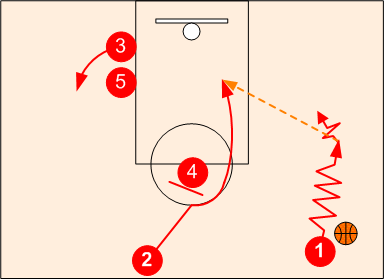
The Hawk Offense is comprised of a wing isolation, a high post shuffle cut and a weakside post up. It is very similar to the "UCLA" Offense in that it involves a guard cutting to the basket off a high post back screen. If the defender gets hung up on the high post screen it will most certainly result in an easy lay-up. When the cutting guard is a strong post up player it can presents additional problems for the defense.
Hawk Offense Schematic Sequence

Defensive Fundamentals Required
 Defending Against Dribble Penetration
Defensive Strategies & Techniques Used To
Combat the Hawk Offense


Basic NBA Show & Recover
Since the high post rub involves a "Big" screening against a "Little," most NBA teams do not like to switch. If the defense switches, the cutter will simply clear out to the corner allowing the screener to slide down and post up against the smaller defender.
Phase 1. Defending the One-on-One Wing Isolation
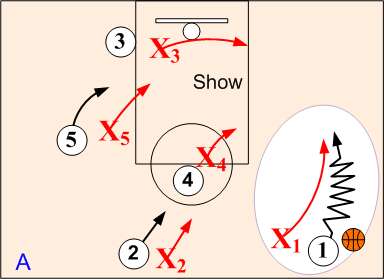
On Ballhandler O1's dribble penetration, defender X1 has to be alert to O1's option of turning the courner and driving hard to the basket. Weakside defenders sag off ("Show") and help out against the One-on-One isolation. When ballhandler O1 stops their dribble penetration, the help defenders can recover back to their opponents.
Caution - Beware
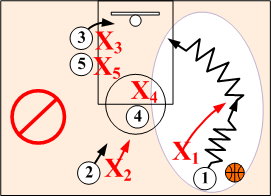
Ballhander hesitates before turning the corner and driving hard to the basket.
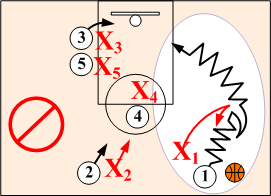
Ballhandler fakes turning back and drives hard to the basket.
Phase 2. Defending the High Post Shuffle Cut
Influencing the cutter away from the ball and behind the high post's screen is the preferred method in the NBA in defending against the off guard's high post rub action.
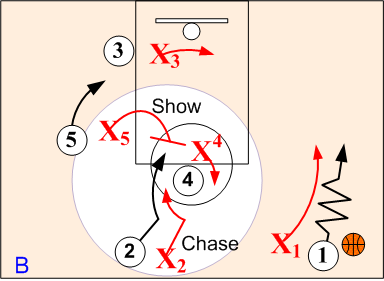
Show. On O2's shuffle cut off O4's high post screen, defender X2 denies O2's direct cut to the basket and forces O2 behind O4's high post screen. Weakside defender X5 steps out and bumps (SHOWS) forcing O2 wide off screen. X2 pursues O1 by chasing over the top of O4's pick. Defender X3 sags off and "Shows" against O1 dribble penetration.
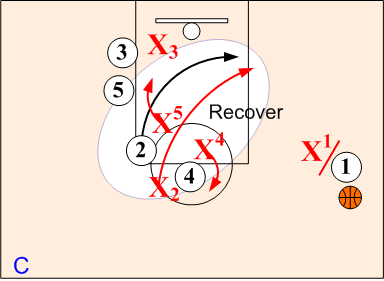
Recover. After forcing O2 wide defender X5 "Recovers" back to O5. Defender X2 catches up to O2 by taking the direct, shorter route. X2 then assumes a 3/4 pass denial position against O2 in low post area.
Phase 3: Defending the Down Screen
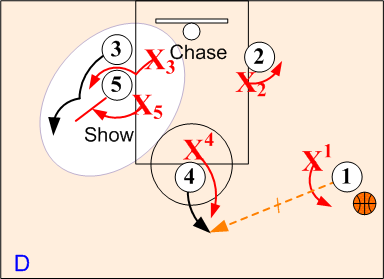
Show. On O1's reversal pass out to O4, X5 steps out and "Shows" forcing shooter O3 wide on O5's down screen. Defender chases O3 out.
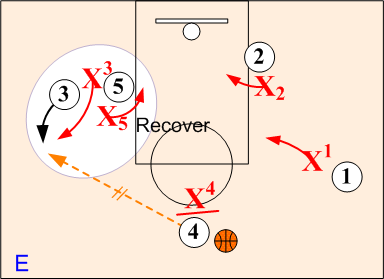
Recover. Defender X3 taking the more direct route around O5's down screen, catches up to O3 and assuming a strong pass denial position. Defender X5 "Recovers" back to O5.
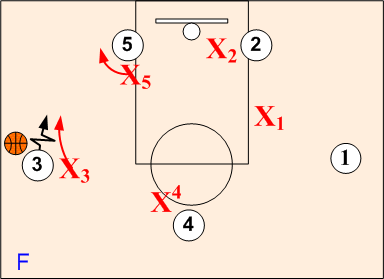
Final Matchup. Defender X3 assumes an aggressive On-Ball position against O3 while X4 and X5 assume pass denial positions. Weakside defenders X1 and X2 sag off to help out inside.


All Out "SOS" Disruption
Total disruption of the Hawk offense can be achieved by having the defense initiate the action and trap the ballhandler in the sideline wing area. The Hawk offense is vulnerable to this wing trap because of the off guard's rub cut into the low post area. With the off guard in a low position, it is difficult for the point to reverse the ball which is a key to defeating the double team.
To be totally effective, however, both individual defensive fundamentals and basic team SOS concepts must be applied.
Phase 1. Defending the One-on-One Wing Isolation
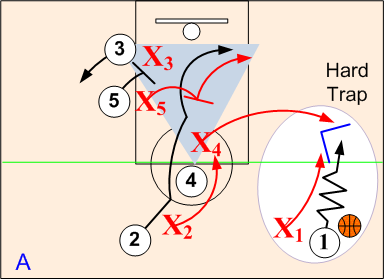
Double Team(Trap). Defensive player X1 pushes the point guard O1 to sideline checkpoint. When O1 approaches the free throw line extended, High post defender X4 breaks out to the wing and traps the ballhandler O1 with X1. When O2 cuts to the basket off O4's high post screen, defender X2 switches to O4 and assumes a pass denial position. X5 in a mid Helpside "I" position bumps and switches to O2. X5 then assumes an aggressive Post Front position when O2 tries to post up. Defender X3 assumes a low Helpside I position anticipating a pass out of the trap.
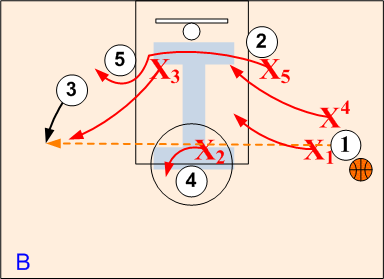
Pass Out of Trap. When O1 makes a cross court pass to open O3, all players rotate according to the near player concept. Defender X3 closes out quickly to O3 and assumes an on ball set position pushing O3 toward the baseline checkpoint. X5 moves across the lane and assumes a full post front position against O5. Defender X2 switches sides on high post O4 maintaining a strong pass denial position. X1 and X4 quickly break the trap, with X4 dropping to a low Helpside "I" postion against O2 and X1 assuming a high Helpside "I" position against O1.
Note: All rotations must take place as ball leaves passer's hands.
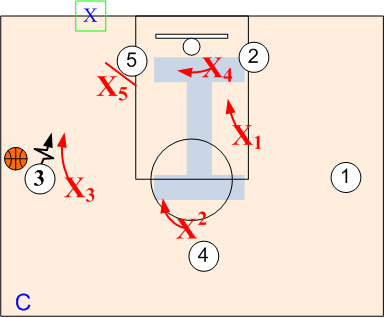
Matchingup. Defender X3 assumes an on ball position and pushes O2 to baseline checkpoint. Defender X1 moves into a mid Helpside "I" position against O1. X2 switches over to opposite side and denies the passing lane to O4. X4 assumes a low Helpside "I" pass denial position against O2, and X5 fronts O5 in low post. Once matched up, basic SOS defensive principles are in effect.
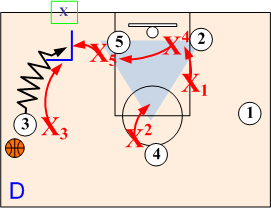
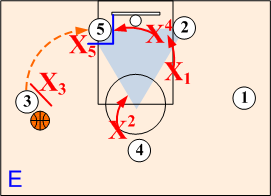
Should O3 drive baseline and penetrate beyond the baseline checkpoint, "Base Go Red" trap rotations occur. If O3 should pass to the post, "Post Trap" rotations take place.
Phase 2. Defending the Shuffle Cut
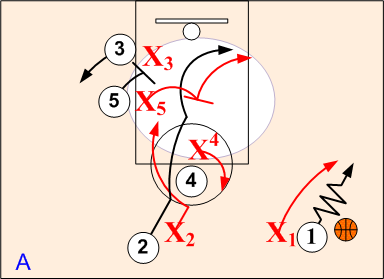
Contact Switch. On O2's shuffle cut off O4's high post screen, defender X2 denies O2's direct cut to the basket and forces O2 behind O4's high post screen. Weakside defender X5 steps out and contact switches to O2. X5 then assumes a strong front against O2 in the low post area. Defender X2 switches to O5 assuming a Helpside "I" position.
Phase 3. Defending the Down Screen
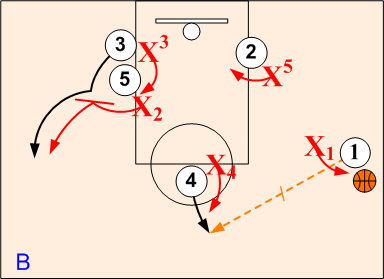
Contact Switch. On the ball reversal pass out to O4, Defenders X2 and X3 execute a contact switch against O5's down screen. Defender X2 switches out to O3 assuming a strong "Snuggle" position while X3 assumes a "Snuggle" Position on O5.
Note: If O1 should down screen for O2, then X1 and X5 execute an aggressive contact switch.
Phase 4. Matching Up
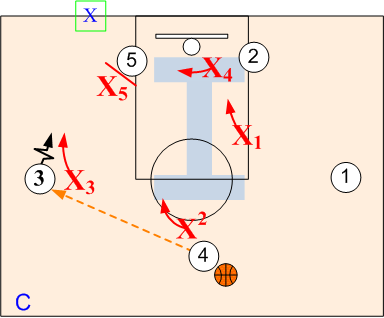
Defender X3 assumes an on ball position and pushes O2 to baseline checkpoint. Defender X1 moves into a mid Helpside "I" position against O1. X2 switches over to opposite side and denies the passing lane to O4. X4 assumes a low Helpside "I" pass denial position against O2, and X5 fronts O5 in low post. Once matched up, basic SOS defensive principles are in effect.


Should wing O3 drive baseline and penetrate beyond the baseline checkpoint, "Base Go Red" trap rotations occur. If O3 passes to the post, "Post Trap" rotations take place.
© 2026 HoopTactics All Rights Reserved.
