


The Case for the Defense
The Mid Screen, with it's array of quick hitting options, is the most used offensive tactic. Therefore, all teams must be prepared to defend it. The Mid Screen Offense involves a "Big" screening against a "Little". If the "On Ball" defender gets hung up on the screen it will most certainly result in successful dribble penetration. When the screener is a strong post up player or good outside shooter it presents additional problems for the defense.
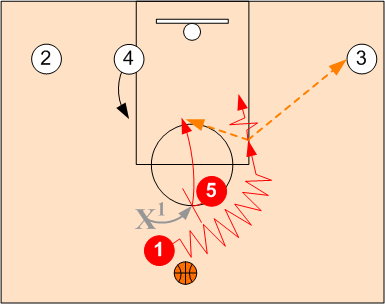
Mid Screen Schematic Sequence

Defensive Fundamentals Required
Proven Defensive Strategies & Techniques
Used to Combat Mid Screen Action


Basic NBA Show & Recover
Since the Mid Screen offense involves a "Big" screening for a "Small" most NBA teams do not like to switch. If the defense switches, the dribbler will simply flair to the wing allowing the screener to slide down and post up against the smaller defender. Therefore, "Show & Recover" is the preferred method in the NBA in defending against mid screen action. However, defensive tactics will vary from team to team and from player to player.
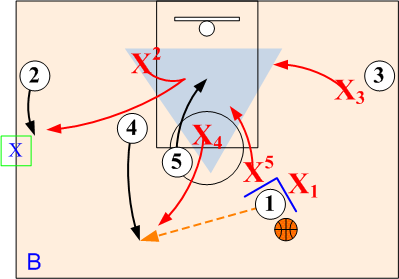
Phase 1. Show (sideline push)
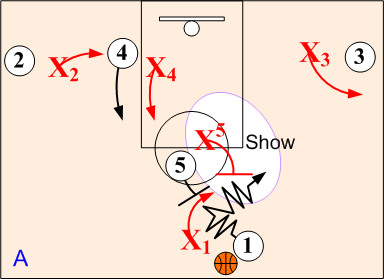
Show. Defender X1 pushes ballhandler O1 to sideline and does not allow dribble penetration over the mid screen. Defender X5 steps out hard (SHOWS) forcing O1 wide off 05's screen. X3 assumes a pass denial position on shooter O2 while X2 and X4 sag off to help out against O5's roll to the basket.
Phase 2: Recover

Recovering after the screen. Once defensive player X1 re-establishes a guarding position on point O1, X5 releases and RECOVERS (dives or sprints) back to post O5. Defender X4 assumes a pass denial position on O4 popping out. X3 maintains a pass denial position against O3 and X2 maintains a weakside help position.
Phase 3: Final Match Up
Matching up after the screen. When O1 passes to O3, X1 assumes a pass denial position on O1. Defender X3 assumes an on ball position forcing O3 toward corner or baseline pushpoint. Post defender X5 assumes a 3/4 post denial position against O5, pushing O5 off the block. X2 and X4 sag off into weakside help positions.
All Out SOS Disruption
Total disruption of the Mid Screen offense is achieved by the defense initiating the action before the first screen option can occur. In attacking and trapping the point guard before any screen or pass can take place, it forces the offensive players out of their planned routes and into a "free lance" situation . Once in this free lance mode, the defense can gain an advantage with execution of their basic defensive fundamentals and team SOS concepts.
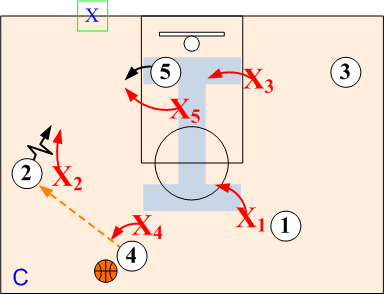
Phase 1: Double Team (trap) Ballhandler
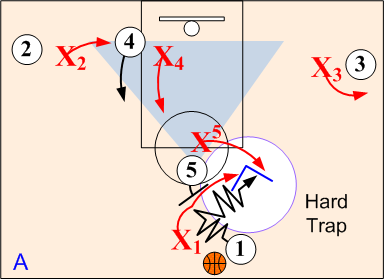
Defender X1 forces ballhandler O1 to baseline checkpoint and does not allow dribble penetration over O5's side screen. Defensive player X5 steps out and double teams (LOCKS UP) the point with player X1. Before side screen is set, X4 rotates over to low post to help out against post O5's roll to basket while X2 and X3 assume helpside Triangle "I" positions.
Phase 2: Pass Out of Trap
When O1 passes the ball out of the trap to O4, all players rotate according to the near player concept. X5 releases out of the trap with X5 diving hard to O5 in low post area while X1 assumes an aggressive SNUGGLE denial position on O1 preventing any return pass to O1. Defender X4 closes out quickly to O4 and assumes an on ball SET position pushing O4 toward the sideline pushpoint. Defender X2 closes out to a SNUGGLE pass denial position of O2 while X3 drops to a Helpside I position. Once matched up, basic SOS defensive principles are in effect.
Note: All rotations must take place as ball leaves passer's hands.
Phase 3: Final Alignment
Matching up after the screen. When O4 passes to wing O2, X2 assumes an on ball "Set" position and pushes the ball handler O2 to baseline checkpoint. X3 maintains a low Helpside "I" position against O3 and defender X1 assumes a high Helpside "I" position. X4 assumes a SNUGGLE pass denial position against O4, and X5 FRONTS O5 in low post area.
Should ballhandler O2 drive baseline, "Base Go I" or at the coach's discretion, "Base Go Red" trap rotations occur. If O3 should pass to the post, "post trap" rotations take place.
