

The Case for the Defense
Since the Triangle Offense's options are predicated on defensive deployment, it poses special and unique problems for the defense. HoopTactics' explores traditional NBA methods along with a more divergent and aggressive SOS disruptive approach. Once these on court battle plan options are reviewed, defensive strategies will become more apparent and much more exciting to watch and analyze.
Triangle Post Schematic Sequence

Defensive Fundamentals Required
Defensive Strategies & Techniques Used To
Combat the Triangle Post Offense

Basic NBA Show & Recover
Basic NBA defenses vary somewhat, but usually the emphasis is on denying the inside by "packing it in" and forcing a perimeter shots. Some teams will also "Show and Recover" against cutters and "On" ball screens along with combining aggressive trapping scenarios into their basic triangle defense.
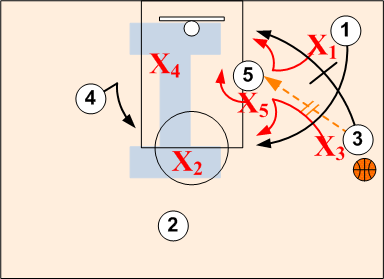
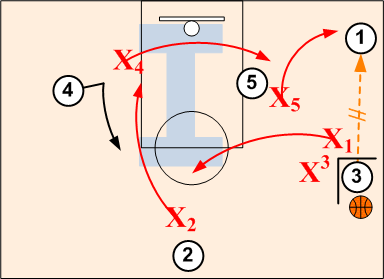
Phase 1: Show (Corner Cut)
On Ball defender X1 denies O1 dribble penetration. When O1 passes to O3, X1 physically disrupts O1's cut to the basket, and assumes a pass denial position against O1 in corner. X3 assumes a pass denial position on O3. When O3 receives a pass from O1, X3 pushes O3 to middle area and weakside help. X5 either plays behind or to the high side of post O5 in a semi-denial position. X2 and X4 move into low and high weakside help positions congesting the three second area.
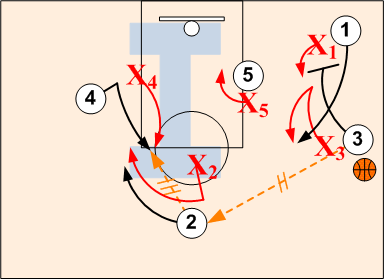
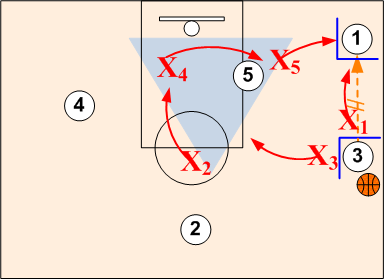
Phase 2: Post Feed
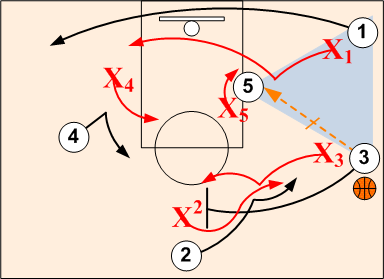
When O3 feeds post O5, X1 defends O1's baseline cut . Defenders X2 and X3 "show and recover" against O3's and O2's high post split. X2 and X4 collapse into weakside help positions congesting the three second area. Post defender X5 plays physically forcing post O5 to shoot a rushed turn around jump shot or pass. If post O5 dribbles the ball, X3 and X4 try to deflect the ball with quick hands.
Phase 3: Corner Screen and Roll
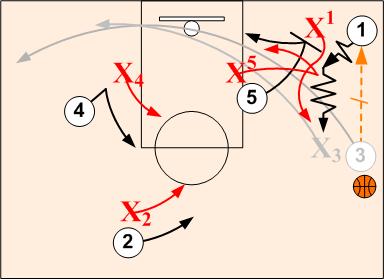
Wing O3 passes to O1 in corner and makes a basket cut. If O1 does not feed O3 on basket cut, O5 executes a screen and roll with O1. X3 physically denies O3's basket cut and then assumes a defensive help position when O3 empties out on the weakside. X5 "Shows" on screen/roll forcing O1 wide and then recovers. Defender X1 fights over the top of O5's screen. X2 X3, and X4 pack it in on weakside forcing O1 to pass to an outside player. X2, X3, and X4 must be ready to execute quick close outs to nearest shooter when O1 penetrates and makes a kick out pass to an open shooter.
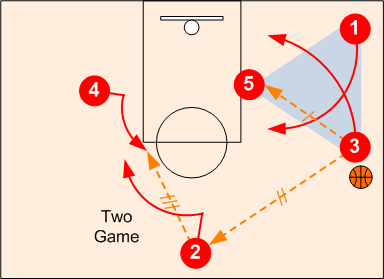
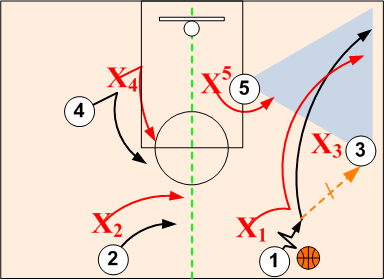
Phase 4: Weakside Two Man Game
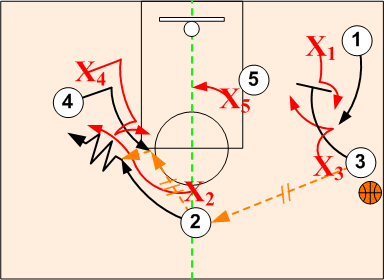
When O2 passes to O4 breaking up to weakside high post position and cuts off O4 for return feed, Defender X4 steps out and "Shows" while defender X2 fights over. On O3's down screen for O1, defender X3 steps out and "Shows" as X1 fights over the top the screen. Defense tries to congest the three second area forcing a perimeter shot.
"SOS" Disruptions
SOS defensive pressure concepts are designed to aggressively disrupt and block the initial flow of the triangle offense. Against the Triangle Offense, the SOS pressure defense can be extended full court in order to lengthen the passing lanes and to pull the offense away from the basket and out of their normal operating areas.
Wing Pass Entry
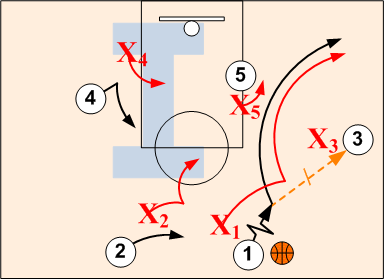
Defensive player X1 pressures 3/4 court forcing dribbler O1 to near sideline checkpoint. When O1 passes to O3, X1 assumes a strong pass denial snuggle position on O1. Defenders X2 and X4 rotate to Helpside "I" positions, and X5 aggressively fronts post O5. Defender X3 pushes O3 to corner checkpoint or baseline checkpoint.
Post Split Action
When O3 feeds post O5 and splits the post with O1, defenders sag off on the post and switch. X2 and X4 assume Helpside I positions.
Ball Reversal Weakside Two Game
On O3's reversal pass out to O2, defender X4 disrupts O4's flash to side post. If O2 passes to O4, X4 sags off and helps out on O2's cut. X2 aggressive fights over O4 disrupting any hand-off pass. Defenders X3 and X4 execute a contact switch on O3's down screen for O4.
Note: On O4's flash, if O4 sets a mid-screen for O2, defenders X2 and X4 counter with an aggressive contact switch.
All Out SOS Disruption
Total disruption of the Triangle Offense can be achieved by the defense initiating the action on the first pass. In attacking and trapping the wing before any cut or pass can take place, it forces the offensive players out of their planned routes and into a "free lance" situation . Once in this free lance mode, the defense can gain an advantage with execution of their basic defensive fundamentals and team SOS concepts.
First Pass Trap
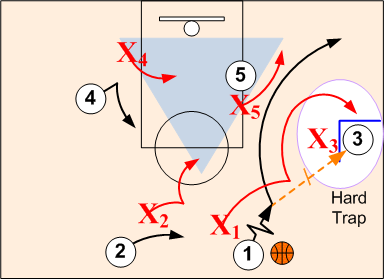
Defensive player X1 pressures 3/4 court and forces dribbler O1 to near sideline checkpoint. When O1 passes to O3, X1 denies O1's basket cut and then releases and traps O3 with X3. Defenders X2 and X4 rotate onto "Triangle I" positions on trap. X5 fronts post O5 ready to close out to open O1. Defender X3 pushes O3 to corner checkpoint trapping wing O3 with X1.
Pass Out of Trap
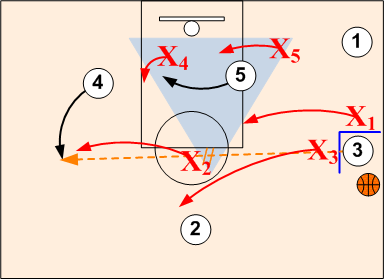
When O3 makes a cross court skip pass to open O4, "Near Player" closes outs are in effect. When defender X2 picks up O4, X3 rotates to O2, X1 drops off O3 into a "Mid-I" position, X5 assumes a "Low-I" position against O1 and X4 assumes a strong post denial position on O5. All basic SOS rules are in effect.
- If O4 drives baseline, "Base Go Red" trap rotations are initiated.
- If O4 feeds post O5, post "Base Go" trap rotations take place.
Note: All rotations must take place as ball leaves passer's hands.
Corner Pass Out of Trap
When O3 passes out of the trap to O1 in corner, X5 closes out to O1 forcing O1 to base checkpoint. X1 rotates over to O2, as X2 drops down to a low Helpside "I" position against O4. X3 assumes a pass denial position on O3. X4 rotates over and establishes a post front position against O5.
Optional Trap on Corner Pass
All out disruption action can continue when O3 passes to O1 in corner. Defender X1 follows the pass and traps O1 with X5. Defenders X2, X3 and X4 rotate into a "Triangle I" anticipating all passes out of the trap.
