- Offensive Techniques & Strategies
Seven Ways to Effectively Attack "On Ball" Screens
| Prevent | Jump Switch | Trap | Trap Early | Show | Shadow | Jam |

1. Prevent (Disrupt) Option.
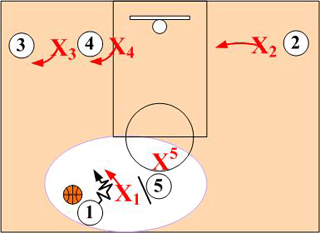
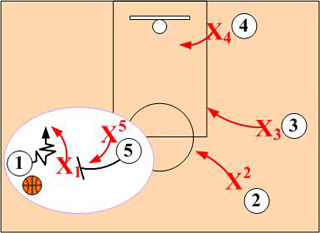
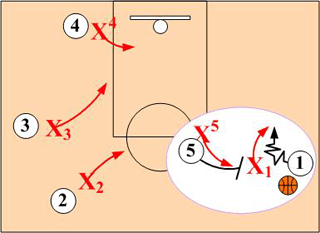
Basically, in combating the On Ball screen the defender should simply influence and force the ballhandler to dribble in a direction away from the screen. The screener's attempt to set a screen should also be disrupted, and the helpside defenders must rotate over to prevent or disrupt the screener's roll to the basket option.
Mid Screen Prevention
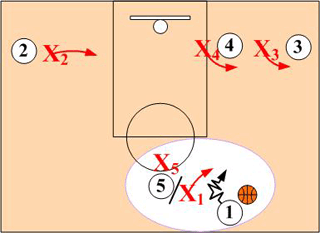
Side Screen Prevention
Horns (Double High Post) Alignment
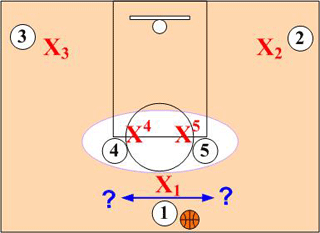
The "Horns" alignment creates somewhat of a dilemma for the On-Ball defender. However, the defender should influence and force the ball handler in the direction of the screener which is the lesser offensive threat. In addition, in using sideline push to keep the ball handler out of the middle of the court ("Red Zone"), it eliminates the double high post screen option altogether.

2. Jump Switch Option
Basic Read: Ballhandler is shaky or screener is an offensive threat to roll and post up.
Aggressively jump switching is an effective weapon in combating the "On Ball" screen (Screen & Roll) especially against weak or shaky ballhandlers. The jump switch option should also be considered against a screener who is a real post up threat. To execute the Jump Switch, the defender guarding the screener must jump out low directly into the dribbler's path. This sudden attack commonly results in a turnover (steal or traveling violation) or in an offensive foul. At the very least it will disrupt the execution of an On Ball screen or dribble hand off.
Mid Screen Disruption
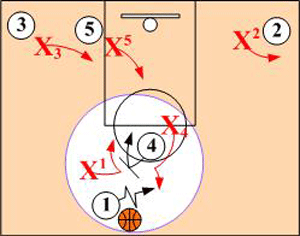
As O1 drives off O4's mid screen, defender X4 executes an aggressive jump switch directly into O1's path. X2 assumes a pass denial position against O2. Defenders X3 and X5 provide weakside support.
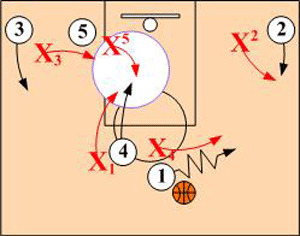
Defender X4 pushes O1 to sideline pushpoint as X1 switches to O4 assuming a strong pass denial position. X5 steps up double teams O4's roll to the basket taking a charge whenever possible.
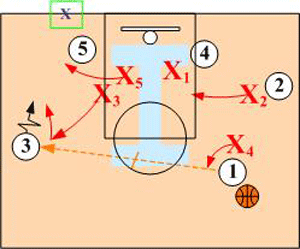
Matching UP. When O1 passes to open wing O3, X3 closes out and pushes O3 to baseline pushpoint. Defender X5 fronts O5 while X4 assumes a pass denial position against O1. X1 and X2 assume Helpside I support positions.
Side Screen Disruption
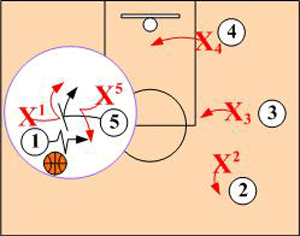
When O1 drives off O5's side screen, X5 executes an aggressive jump switch directly into O1's path. X2 assumes a pass denial position against O2. Defenders X3, and X4 provide weakside support.
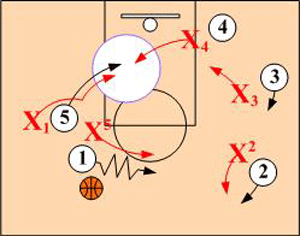
Defender X1 switching to O5 assumes a pass denial against O5's roll to the basket. If O5 is a real offensive threat rolling to the basket or posting up, X4 steps over and double teams O5 with X1.
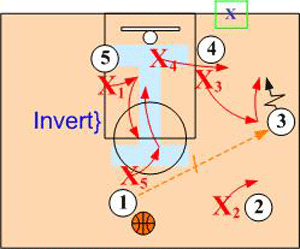
Matching UP. If O1 passes to open wing O3, X3 closes out to O3. Defender X4 fronts O4's post up while X2 assumes a pass denial position against O2. X1 and X5 assume Helpside I support positions inverting when possible.
Double Mid Screens (Horns) Disruption
The On-Ball defender should make every effort to keep the ballhandler out of the middle of the court. Preferably, forcing the dribbler toward the sideline PushPoint on the side of the screener who is the lesser offensive threat.
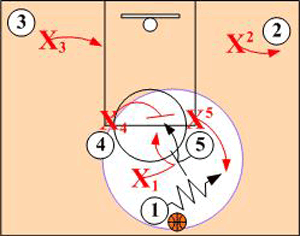
As ballhandler O1 drives off O5's mid screen, defender X5 executes an aggressive jump switch directly into O1's path. X4 drops off and blocks O5's roll to the basket.
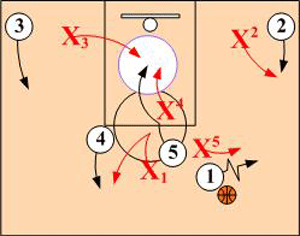
Defender X1 switches to O4 popping out and assumes a pass denial position. X4 assumes a pass denial position against O5's roll to the basket, X3 steps up and double teams O5 with X4.
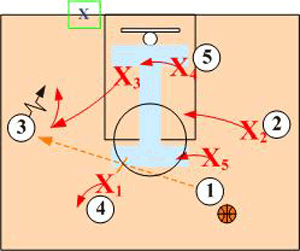
Matching UP. If O1 passes to open wing O3, X3 closes out and pushes O3 to baseline pushpoint. Defender X1 assumes a pass denial position on O4. Defenders X2, X4 and X5 assume Helpside I positions.

3. Trap Option
Basic Read: Ballhandler is a big offensive threat.
Disruption of the "On Ball" screen can be achieved by trapping or double teaming the ballhandler. This is an important option to consider when faced with defending against a hard to guard ballhandler who can beat you with a pass as well as off the dribble.
Mid Screen Disruption
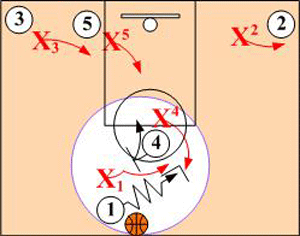
As ballhandler O1 drives off O4's mid screen, defender X4 steps out and aggressively traps O1 with X1. X2 assumes a pass denial position against O2 on ball side while X3 and X5 provide backside support.
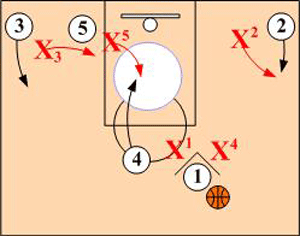
Defender X5 rotates up and assumes a pass denial position on screener O4 rolling to the basket. Defender X3 rotates to O4. X1 and X4 "lock up" and smother O1, disrupting O1's passing vision by having both hands up.
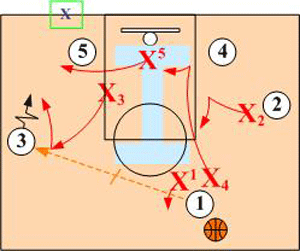
Matching UP. When O1 passes to open wing O3, X3 closes out and pushes O3 to baseline pushpoint. Defender X5 fronts O5 while X1 assumes a pass denial position against O1. X2 and X4 assume Helpside I support positions inverting if possible.
Side Screen Disruption
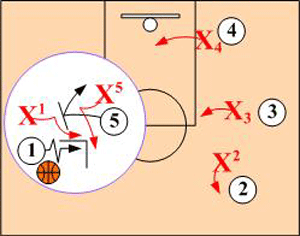
When O1 drives off O5's side screen, defender X5 aggressively steps out and traps O1 with X1. X2 assumes a pass denial position against O2. Defenders X3, and X4 provide weakside support.
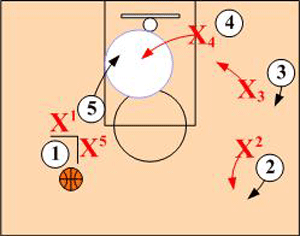
Defender X4 rotates over and assumes a pass denial position on screener O5 rolling to the basket. Defender X3 rotates to O4. X1 and X5 "lock up" and smother O1.
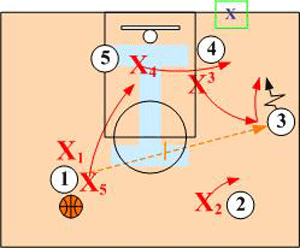
Matching UP. If O1 passes to open wing O3, X3 closes out to O3. Defender X4 fronts O4's post up while X2 assumes a pass denial position against O2. X1 and X5 assume Helpside I support positions inverting when possible.
Double Mid Screens (Horns) Disruption
The On-Ball defender should make every effort to keep the ballhandler out of the middle of the court. Preferably, forcing the dribbler toward the sideline PushPoint on the side of the screener who is the lesser offensive threat.
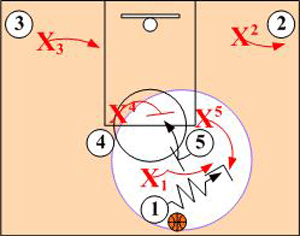
As ballhandler O1 drives off O5's mid screen, defender X5 steps out and aggressively traps O1 with X1. Defender X4 sags off and physically blocks O5's roll to the basket. Defender X3 rotates into a backside support position and X2 assumes a pass denial position against O2.
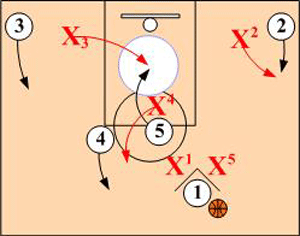
Defender X4 after disrupting O5's roll to the basket rotates back to O4. Helpside defender X3 picks up O5 rolling to the basket assuming a pass denial position. X1 and X5 "Lock Up" and smother O1.
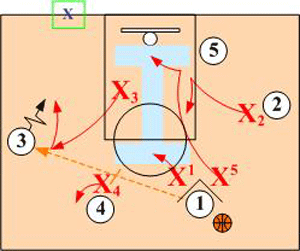
Matching UP. If O1 passes to open wing O3, X3 closes out and pushes O3 to baseline pushpoint. Defender X4 assumes a pass denial position on O4. Defenders X1, X2 and X5 assume Helpside I positions. Defenders X2 and X5 invert when possible.

4. Trap Early Option
Basic Read: Both ballhandler & screener are offensive threats.
Total disruption can be achieved by trapping the ballhandler before an On Ball screen can be set. The Early Trap can be an effective weapon to use when both the ballhandler and the screener are great players that play off each other.
Mid Screen Disruption
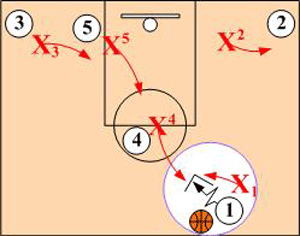
Defender X4 steps out traps ball hander O1 with X1 before O4 can set the Mid Screen. X2 assumes a pass denial position against O2 on ball side. X3 and X5 rotate into backside help positions.
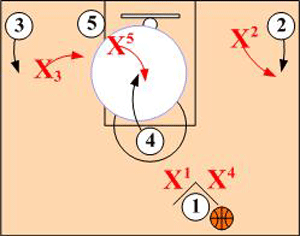
Defender X5 rotates up and assumes a pass denial position on screener O4 rolling to the basket. Defender X3 rotates to O4. X1 and X5 aggressively trap O1.
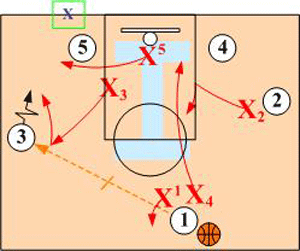
Matching Up. When O1 passes to open wing O3, X3 closes out and pushes O3 to baseline pushpoint. Defender X5 fronts O5 while X1 assumes a pass denial position against O1. X4 drops and assumes a Helpside I support position inverting with X2 if possible.
Side Screen Disruption
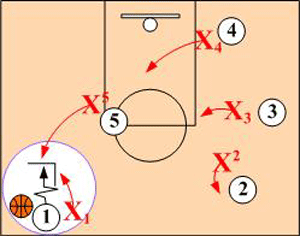
Defender X5 steps out aggressively traps ball hander O1 with X1 before O5 can set a Side Screen. X4 rotates to O5 and X3 moves to the low Helpside I position. X2 assumes a pass denial position against O2 on ball side.
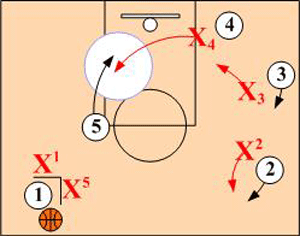
Defender X4 rotates over and assumes a pass denial position on screener O5 rolling to the basket. Defender X3 rotates to O4. X1 and X5 "lock up" and smother O1.
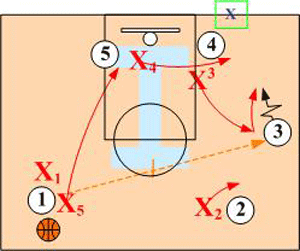
Matching Up. If O1 passes to open wing O3, X3 closes out to O3. Defender X4 fronts O4's post up while X2 assumes a pass denial position against O2. X1 and X5 drop into Helpside I support positions.
Double Mid Screens (Horns) Disruption
The On-Ball defender should make every effort to keep the ballhandler out of the middle of the court. Preferably, forcing the dribbler toward the sideline PushPoint on the side of the screener who is the lesser offensive threat.
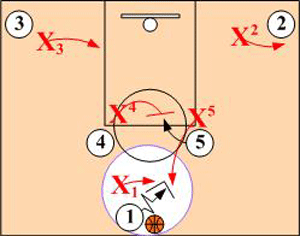
Defender X5 steps out and aggressively traps O1 with X1 before O5 can set a Mid Screen. Defender X4 rotates over and blocks O5's roll to the basket. X3 moves into a backside support position, and X2 assumes a ball side pass denial position against O2.
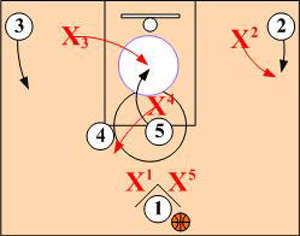
Defender X4 after disrupting O5's roll to the basket rotates back to O4. Helpside defender X3 picks up O5 rolling to the basket assuming a pass denial position. X1 and X5 execute a hard trap on O1.
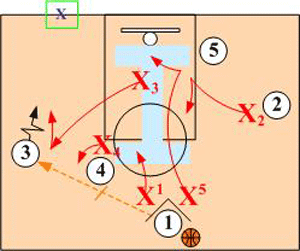
Matching Up. When O1 passes to open wing O3, X3 closes out and pushes O3 to baseline pushpoint. Defender X4 maintains a pass denial position on O4. X1, X2 and X5 drop into Helpside I positions. If possible, X2 and X5 should INVERT.

5. Show & Recover Option
Basic Read: Screener is not an offensive threat.
"Show & Recover" is the method of choice for most NBA teams in defending against the On Ball screen (Screen & Roll). The Show & Recover technique involves the player defending the screener to step out ("Show") into the ballhandler's path forcing the ballhandler wide and allowing time for ballhandler's defender to catch up after fighting over the screen. Once the ballhandler's defender is in a position to re-assume a guarding position, the player that "Shows" releases (/Recovers) back to the screener rolling to basket or popping out.
Mid Screen Disruption
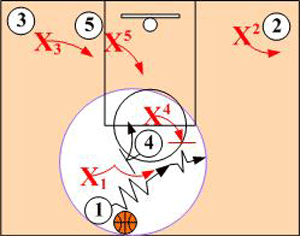
Defender X4 steps out directly into O1's path (SHOWS) and forces O1 wide. X1 chases O1 over O4's screen while X2 assumes a pass denial position against O2. Defenders X3 and X5 provide weakside support.
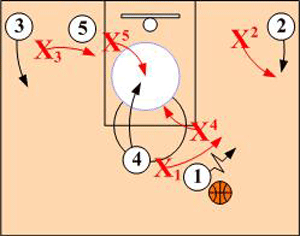
Once Defender X1 re-establishes a guarding position on O1, X4 releases and rotates back to screener O4 rolling to the basket. X5 step ups covers O4 until X4 can recover to a pass denial position on O4.
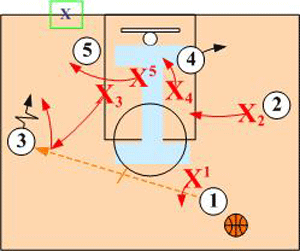
Matching UP. When O1 passes to open wing O3, X3 closes out and pushes O3 to baseline pushpoint. Defender X5 fronts O5 while X1 assumes a pass denial position against O1. X4 and X2 assume Helpside I support positions.
Side Screen Disruption
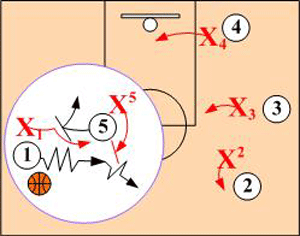
When O1 drives off O5's side screen, X5 steps out directly into O1's path (SHOWS) forcing O1 to dribble wide. X1 chases O1 over O5's side screen while X2 closes out to a pass denial position against O2. Defenders X3 and X4 provide helpside support.
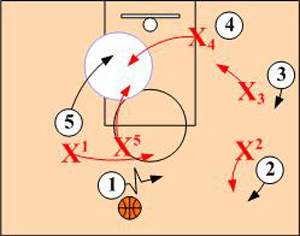
When Defender X1 establishes a guarding position on O1, X5 releases back to screener O5 rolling to the basket. X4 covers O5 until X5 can recover to a guarding position on O5.
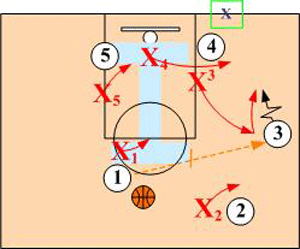
Matching UP. If O1 passes to open wing O3, X3 closes out to O3. Defender X4 fronts O4's post up while X2 assumes a pass denial position against O2. X1 and X5 assume Helpside I support positions.
Double Mid Screens (Horns) Disruption
The On-Ball defender should make every effort to keep the ballhandler out of the middle of the court. Preferably, forcing the dribbler toward the sideline PushPoint on the side of the screener who is the lesser offensive threat.
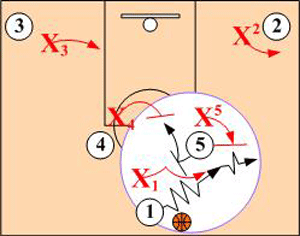
When O1 drives off O5's screen, X5 aggressive steps out directly into O1's path (SHOWS) and forces O1 wide. X4 rotates over and blocks O5's roll to the basket. X1 chases O1 over O5's mid screen. X2 assumes a pass denial position against O2. Defender X3 provides weakside support.
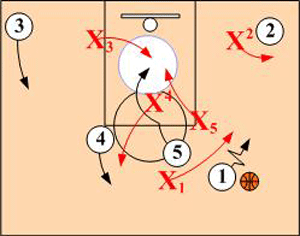
Once X1 re-establishes a guarding position on O1, X5 releases back to screener O5. X3 covers O5 until X5 can recover to a guarding position on O5. X4 rotates back to a pass denial position against O4.
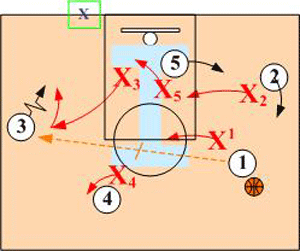
Matching UP. When O1 passes to open wing O3, X3 closes out and pushes O3 to baseline pushpoint. Defender X4 maintains a pass denial position on O4. X1, X2 and X5 drop into Helpside I positions.

6. Shadow Option
Basic Read: Ballhandler is a penetrator and screener is not an outside threat.
When the screener is not an offensive threat, the defender can sag off into a support (Shadow) position. The "Shadow" player playing off in the supporting role has options of trapping, faking a trap or jump switching. When possible the defender guarding the ballhandler forces the ballhandler away from the screen towards the sideline pushpoint.
Mid Screen Disruption
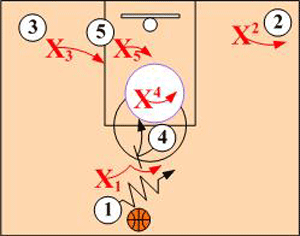
When O4 sets a mid screen, X4 sags off (zones) to discourage any dribble penetration by O1. Defender X1 chases O1 over O4's mid screen. X2 assumes a pass denial position against O2 on ball side. Defenders X3 and X5 provide weakside support.
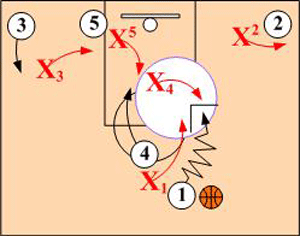
If O1 penetrates on dribble below the free throw line, defender X4 traps O1 with X1 X5 /step ups and takes screener O4 rolling to the basket. X3 rotates to O5 and X2 maintains a pass denial position against O2.
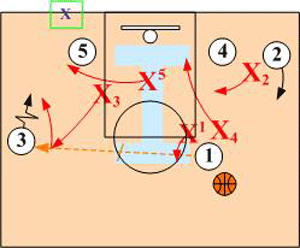
Matching UP. When O1 passes to open wing O3, X3 closes out and pushes O3 to baseline pushpoint. Defender X5 fronts O5 while X1 assumes a pass denial position against O1. X4 and X2 assume Helpside I support positions.
Side Screen Disruption
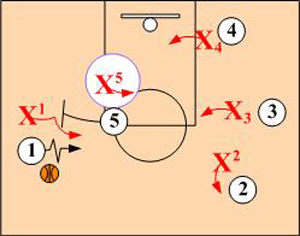
When O1 drives off O5's side screen, X5 sags off (zones) to discourage any dribble penetration by O1. Then X1 chases O1 over O5's mid screen. X2 assumes a pass denial position against O2 on ball side. Defenders X3 and X4 provide weakside support.
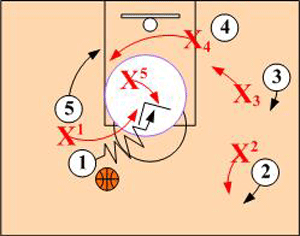
If O1 penetrates on dribble, defender X5 traps O1 with X1. X4 steps over and takes screener O5 rolling to the basket. X3 rotates to O4 and X2 maintains a pass denial position against O2.
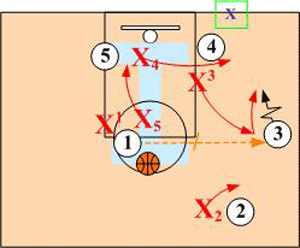
Matching UP. If O1 passes to open wing O3, X3 closes out to O3. Defender X4 fronts O4's post up while X2 assumes a pass denial position against O2. X1 and X5 assume Helpside I support positions.
Double Mid Screens (Horns) Disruption
The On-Ball defender should make every effort to keep the ballhandler out of the middle of the court. Preferably, forcing the dribbler toward the sideline PushPoint on the side of the screener who is the lesser offensive threat.
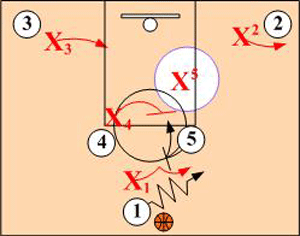
When O1 drives off O5's screen, X5 sags off (zones) to discourage any dribble penetration by O1. X1 chases O1 over O5's screen. X2 assumes a pass denial position against O2 on ball side. Defenders X3 and X4 provide weakside support.
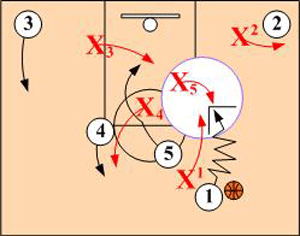
If O1 penetrates on dribble, defender X5 traps O1 with X1 X4, after blocking O5's roll to the basket, rotates back to O4. Helpside defender X3 picks up screener O5, and X2 maintains a pass denial position against O2.
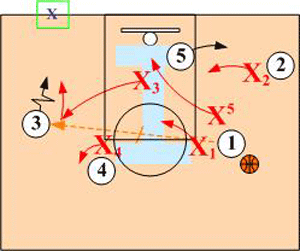
Matching UP. When O1 passes to open wing O3, X3 closes out and pushes O3 to baseline pushpoint. Defender X4 maintains a pass denial position on O4. X1, X2 and X5 drop into Helpside I positions.

7. Jam Screener Option
Basic Read: Ballhandler is not an outside threat.
When the ballhandler is not an outside threat, the defender guarding the screener can disrupt the On Ball screen by playing tight and forcing the screener out high away from defender X1 and into the ballhandler's path. Defender X1 then goes below the screener staying with O1 and protecting against a drive.
Mid Screen Disruption
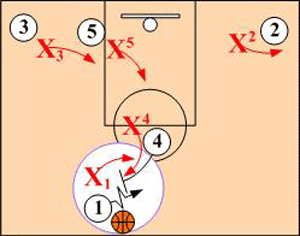
Defender X4 "Jams" and disrupts the screener O4 from setting a screen on X1 by forcing O4 high into the ballhandler O1. This allows X1 to go under O4's mid screen. X2 assumes a pass denial position against O2 on ball side. X3 and X5 provide backside help
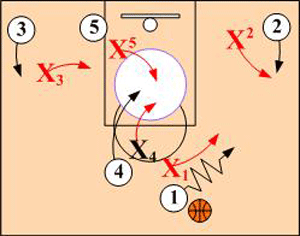
X4 assumes a pass denial position on screener O4's roll to the basket. If the screener O4 is an offensive threat, X5 can step up and double team O4 with X4. X3 rotates to O5 and X2 maintains a pass denial position against O2..
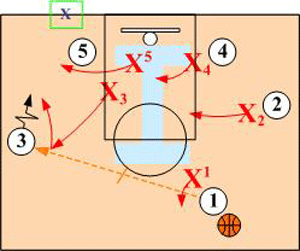
Matching Up. When O1 passes to open wing O3, X3 closes out and pushes O3 to baseline pushpoint. Defender X5 fronts O5 while X1 assumes a pass denial position against O1. X4 and X2 assume Helpside I support positions.
Side Screen Disruption
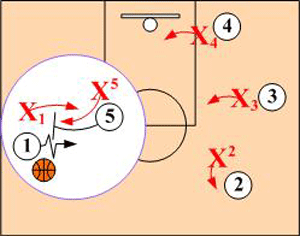
X5 disrupts the screener O5 from setting a screen on X1 by physically forcing O5 into the ballhandler O1. This allows X1 to go under O5's side screen. Defenders X3 and X4 provide weakside support while X2 closes out to a pass denial position against O2.
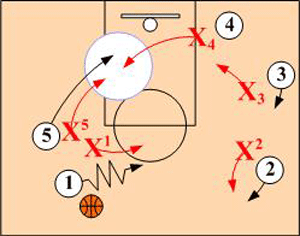
X5 assumes a pass denial position on screener O5 rolling to the basket. If the screener O5 is an offensive threat, X4 can step up and double team O5 with X5. X3 rotates to O4 and X2 maintains a pass denial position against O2.
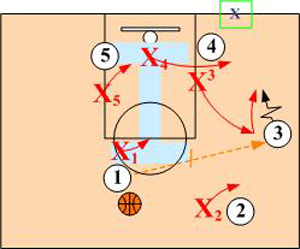
Matching Up. If O1 passes to open wing O3, X3 closes out to O3. Defender X4 fronts O4's post up while X2 assumes a pass denial position against O2. X1 and X5 assume Helpside I support positions.
Double Mid Screens (Horns) Disruption
The On-Ball defender should make every effort to keep the ballhandler out of the middle of the court. Preferably, forcing the dribbler toward the sideline PushPoint on the side of the screener who is the lesser offensive threat.
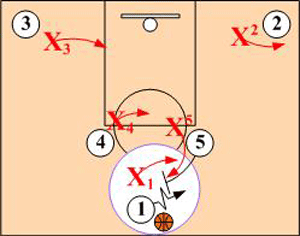
X5 "Jams" and disrupts the screener O5 from setting a screen on X1 by forcing O5 high into the ballhandler O1. This allows X1 to go under O5's screen. X2 assumes a pass denial position against O2. Defenders X3 and X4 provide weakside support with X4 physically blocking O5's roll to the basket.
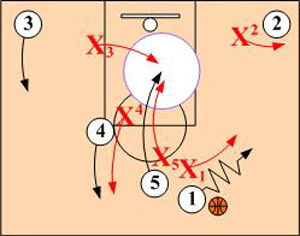
Defender X5 assumes a pass denial position on screener O5's roll to the basket. If O5 is an offensive threat, X3 can step up and double team O5 with X5. X4 rotates back to O4 and X2 maintains a pass denial position against O2. When O1 picks up the dribble, defender X1 assumes an aggressive smother position.
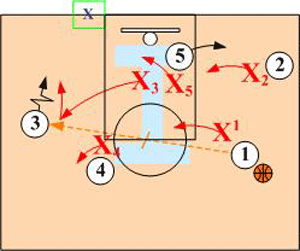
Matching Up. If O1 passes to open wing O3, X3 closes out and pushes O3 to baseline pushpoint. Defender X4 maintains a pass denial position on O4. X1, X2 and X5 drop into Helpside I positions.
Return to Player Development - Click Here
Return to Defensive Strategies - Click Here
Return to HoopTactics - Click Here
© 2026 HoopTactics All Rights Reserved.
