- Offensive Techniques & Strategies

Shadow Blitz Pressure
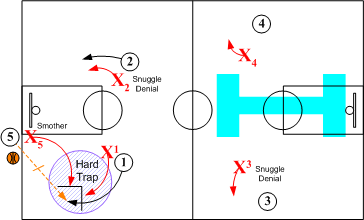
In the SOS all out "Blitz" extreme SMOTHER pressure is applied to the ball along with strong SNUGGLE pass denial pressure on all passing lanes. Normally an aggressive trap is executed on the inbounds pass in the deep back court area. However, the trap can also be faked (HOLD) occassionally to keep the opponents off balance.

Hard Trap Option
When deploying all out BLITZ disruptions, on made shots extreme pressure is exerted on the inbounds pass and all first passing lanes. When the ball is inbounded an aggressive TRAP takes place.
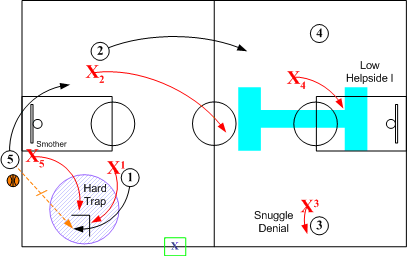
On a made shot all out pressure is applied denying any inbounds pass. Once the ball is inbounded to O1, immediately lock up and TRAP O1. Defender X2 rotates from a SNUGGLE denial position on O2 to a high Helpside "I" position. X3 maintains a SNUGGLE pass denial position on O3. X4 rotates to a low Helpside "I" position. On the inbounds pass, X5 sprint releases to a "Shadow" support position 8' to 10' directly behind X1 ready to trap the ball handler O1 with X1 on near sideline checkpoint.
Note: If ball is inbounded to O2, X2 and X5 trap O2 immediately.
Phase 2: Pass Out of Trap
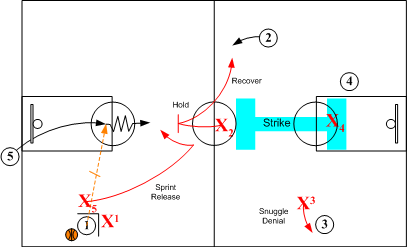
When O1 passes out of the trap to O5, defender X2 steps up and temporarily holds O5's dribble penetration until X5 can assume an ON ball defensive position on O5. O2 then releases to a SNUGGLE denial on O2. O1 takes a strong SNUGGLE pass denial position on O1 While X3 and X4 match up with O3 and O4 respectively.
Phase 3: Matching Up
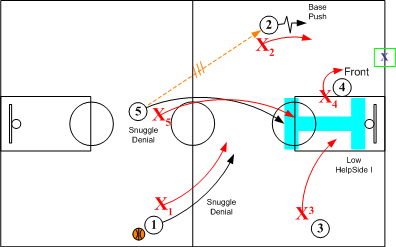
When O5 passes out to O2, X2 assumes a SET position and pushes O2 to corner or baseline checkpoint. X4 FRONTS O4 in the low post area. X5 assumes a Snuggle denial on O5. Defenders X1 and X3 form a double Helpside "I".
Anytime the ball is advanced on dribble or pass to an area below the free throw line extended, SOS Base Go I or at the coach's discretion Base Go Red rules are in effect.
Note: All closeouts and rotations take place as the ball leaves the passer's hands.
Trap - Left Side
When deploying all out BLITZ disruptions, on made shots extreme pressure is exerted on the inbounds pass and all first passing lanes. When the ball is inbounded an aggressive TRAP takes place.
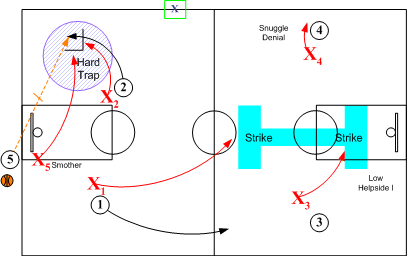
On a made shot all out pressure is applied denying any inbounds pass. Once the ball is inbounded to O2, immediately lock up and TRAP O2. Defender X1 rotates from a SNUGGLE denial position on O1 to a high Helpside "I" position. X4 maintains a SNUGGLE pass denial position on O4. X3 rotates to a low Helpside "I" position. On the inbounds pass, X5 sprint releases and traps O2 with X2.
Phase 2: Pass Out of Trap.
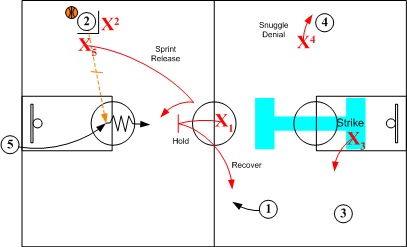
When O2 passes out of the trap back to O5, defender X1 steps up and temporarily holds O5's dribble penetration until X5 can assume an ON ball defensive position on O5. O1 then releases to a SNUGGLE denial on O1. O2 takes a SNUGGLE pass denial position on O2. Defenders X3 and X4 match up with O3 and O4 respectively.
Phase 3: Matching Up
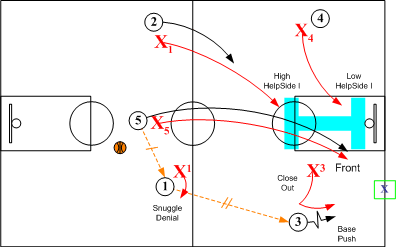
When O5 passes to O1, X1 assumes a SET position and pushes O2 to sideline checkpoint. X3 closes out to a SNUGGLE pass denial position on O3. X2 and X4 rotate into Helpside "I" positions and X5 assumes a Snuggle denial on O5.
If O1 passes ahead to O3, X3 assumes a SET position and pushes O3 to corner or baseline check point. X1 takes a strong SNUGGLE pass denial position on O1 preventing any return pass. Defender X5 FRONTS O5 in the low post area. Defenders X2 and X4 assume helpside "I" positions. Anytime the ball is advanced on dribble or pass to an area below the free throw line extended, SOS Base Go I or at the coach's discretion Base Go Red rules are in effect.
Note: All closeouts and rotations take place as the ball leaves the passer's hands.

Blitz Hold Option
This secondary hold action eliminates any back court trapping and attempts to force turnovers with all out first pass denials. No backcourt traps are used. Once ball is inbounded basic SOS fundamentals are in effect.
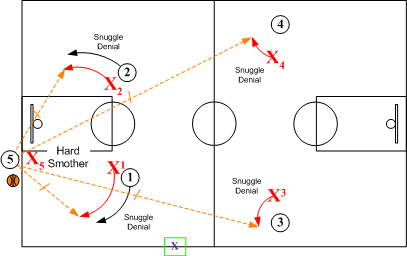
Blitz Hold starts out with extreme pressure on the ball and first passing lanes; however, once the ball in inbounded there is no trap.
Phase 2: Inbounds Pass Rotations
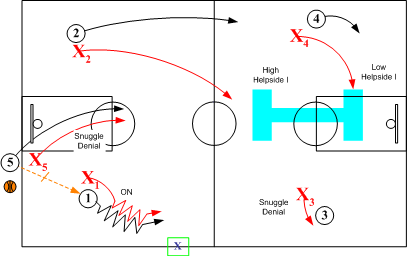
When the ball is inbounded to O1, X1 moves from a SNUGGLE position to an ON position forcing O1 to near sideline checkpoint. Defender X2 rotates from a SNUGGLE denial position on O2 to a high Helpside "I" position. X3 maintains a SNUGGLE pass denial position on O3. X4 rotates to a low Helpside "I" position. On the inbounds pass, X5 moves from a SMOTHER position to a SNUGGLE denial position on X5 denying any return pass.
Phase 3: Basic SOS Disrutions
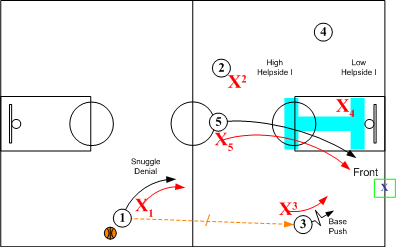
When O1 passes ahead to O3, defender X3 assumes a SET position and forces O3 to corner or baseline checkpoint. X1 assumes a strong SNUGGLE denial on O1 preventing any return pass. X2 and X4 maintain double Helpside "I" positions. Defender X5 FRONTS O5 in the low post area.
Anytime the ball is advanced on dribble or pass to an area below the free throw line extended, SOS Base Go I or at the coach's discretion Base Go Red rules are in effect.
Note: All closeouts and rotations take place as the ball leaves the passer's hands.
Left Side Entry

Blitz Hold starts out with the extreme pressure on the ball and first passing lanes; however, once the ball in inbounded there is no trap.
Phase 2: Inbounds Pass Action
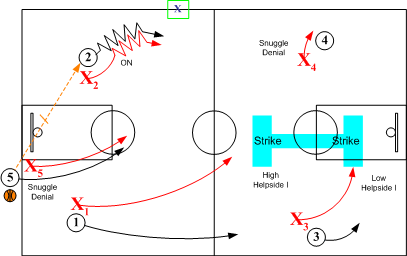
When the ball is inbounded to O2, X2 moves from a SNUGGLE position to an ON position forcing O2 to near sideline checkpoint. Defender X1 rotates from a SNUGGLE denial position on O1 to a high Helpside "I" position. X4 maintains a SNUGGLE pass denial position on O4. X3 rotates to a low Helpside "I" position. On the inbounds pass, X5 moves from a SMOTHER position to a SNUGGLE denial position on X5 denying any return pass.
Phase 3: Basic SOS Disruptive Pressure
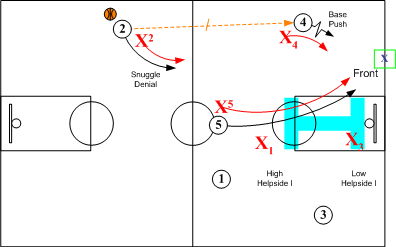
If O2 passes ahead to O4, defender X4 assumes a SET position and forces O4 to corner or baseline checkpoint. X2 assumes a strong SNUGGLE denial on O2 creating "Box Pressure" by preventing any return pass to O2. X1 and X3 maintain double Helpside "I" positions. Defender X5 FRONTS O5 in the low post area.
Anytime the ball is advanced on dribble or pass to an area below the free throw line extended, SOS Base Go I or at the coach's discretion Base Go Red rules are in effect.
Note: All closeouts and rotations take place as the ball leaves the passer's hands.
Return to Defensive Strategies - Click Here
Return to HoopTactics - Click Here
© 2026 HoopTactics All Rights Reserved.
