- Offensive Techniques & Strategies

Up Shadow
The "Up" Shadow differs from the basic Shadow in that on the made shot, the player defending the inbound passer SMOTHERS and exerts strong pressure on the inbounds passer while all other defenders assume strong SNUGGLE pass denial positions. When the inbounds pass is made, the defender sprint releases and assumes a normal shadow position. Once in position, the "Shadow" can either trap or hold (fake the trap).
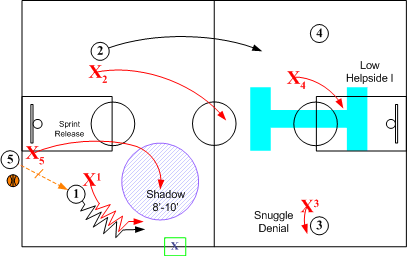
When the ball is inbounded to O1, X1 after initially assuming a SNUGGLE pass denial position on O1, moves to an ON position and pushes O1 to side checkpoint. Defender X2 rotates from a SNUGGLE denial position on O2 to a high Helpside "I" position. X3 maintains a SNUGGLE pass denial position on O3. X4 rotates to a low Helpside "I" position. On the inbounds pass, X5 sprint releases to a "Shadow" support position 8' to 10' directly behind X1 ready to trap the ball handler O1 with X1 on near sideline checkpoint.
Note: If ball is inbounded to O2, X2 assumes the ON position with X5 assuming a "Shadow" position behind X2. X4 maintains a pass denial SNUGGLE position on O4, and X1 and X3 rotate into Helpside "I" positions.

Trap Option
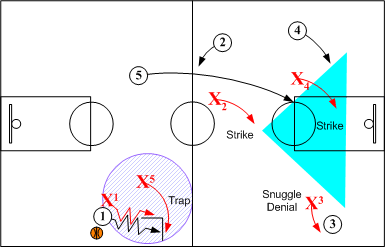
ON ball defender X1 and "Shadow" X5 lock up and trap dribbler O2 on near sideline checkpoint. X2, X3 and X4 form a Helpside Triangle "I". Shadow X5 also has options of faking the trap (Hold) or "Jump Switching" according to coach's decision.
CAUTION: when any time the shadow player X5 is unable to get into proper position, Shadow pressure is off and basic half court oriented SOS rules apply. Also, on any deep outlet or outlet into the middle of the floor, Shadow pressure is not feasible, and basic transition pressure defense is in effect.
Matching Up
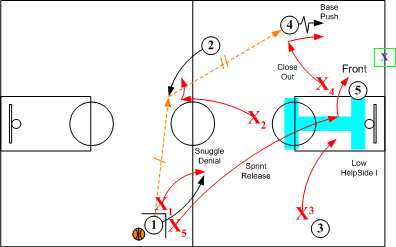
When O1 passes out to O2, X2 closes out and pushes O2 to sideline checkpoint. X4 closes out to O4 and assumes a SNUGGLE pass denial position. X5 sprint releases to the basket and guards O5. X3 drops into a low Helpside "I" position, and X1 takes a strong pass denial position against O1, preventing any return pass that would allow O1 to initiate the set offense.
Caution: It is extremely important that all close outs and rotations take place as the ball leaves the passer's hands.
If O2 passes ahead to O4, X4 assumes a SET position and pushes O4 to corner or baseline checkpoint. X5 FRONTS O5 in low post area. X2 creates "Box Pressure" by assuming a Snuggle pass denial position on O2. X1 and X3 take Helpside "I" positions. Anytime the ball is advanced on dribble or pass to an area below the free throw line extended, SOS Base Go I or at the coach's discretion Base Go Red rules are in effect.
Anytime the ball is advanced on dribble or pass to an area below the free throw line extended, SOS Base Go I or at the coach's discretion Base Go Red rules are in effect.
Trap - Left side
On the made shot, the player defending the inbound passer SMOTHERS and exerts strong pressure on the inbounds passer while all other defenders assume strong SNUGGLE pass denial positions.
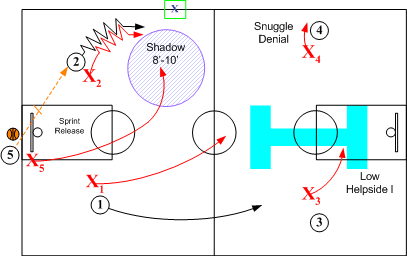
When the ball is inbounded to O2, X2 after initially assuming a SNUGGLE pass denial position on O1, moves to an ON position and pushes O2 to side checkpoint. Defender X1 rotates from a SNUGGLE denial position on O1 to a high Helpside "I" position. X4 maintains a SNUGGLE pass denial position on O4. X3 rotates to a low Helpside "I" position. On the inbounds pass, X5 sprint releases to a "Shadow" support position 8' to 10' directly behind X2 ready to trap the ball handler O2 with X1 on near sideline checkpoint.
Double Team (Trap)
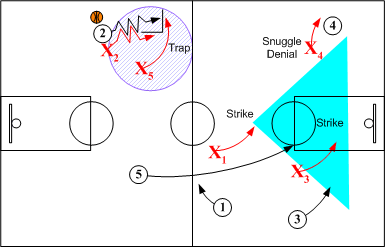
ON ball defender X2 and "Shadow" X5 lock up and trap dribbler O2 on near sideline checkpoint. X1, X3 and X4 form a Helpside Triangle "I". Shadow X5 also has options of faking the trap (Hold) or "Jump Switching" according to coach's decision.
Matching Up
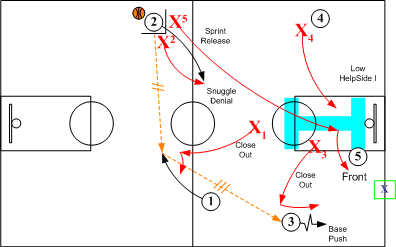
When O2 passes out to O2, X1 closes out and pushes O1 to sideline checkpoint. X3 closes out to O3 and assumes a SNUGGLE pass denial position. X5 sprint releases to the basket and guards O5. X4 drops into a low Helpside "I" position, and X2 takes a pass denial position against O2, preventing any return pass to O2.
Caution: It is very important that all close outs and rotations take place as the ball leaves the passer's hands.
If O1 passes ahead to O3, X3 assumes a SET position and pushes O3 to corner or baseline checkpoint. X5 FRONTS O5 in low post area. X1 creates "Box Pressure" by assuming a Snuggle pass denial position on O1. X2 and X4 form a double Helpside "I" positions. ion Base Go Red rules are in effect.
Anytime the ball is advanced on dribble or pass to an area below the free throw line extended, SOS Base Go I or at the coach's discretion Base Go Red rules are in effect.

Up Shadow HOLD
Up Shadow HOLD option allows the "Shadow" defender to fake a trap on the ball handler near mid court, and release back to a SNUGGLE pass denial position on the inbounds passer O5. The HOLD option keeps the offensive point guard confused and off balance as to whether the trap is going to occur.
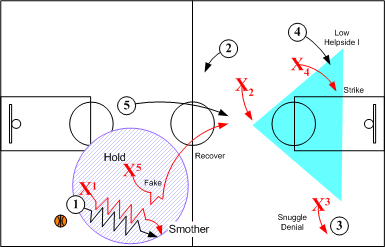
With X5 in a support "Shadow" position, X1 applies extreme pressure on ball hanlder O1, forcing O1 to near sideline checkpoint. X3 maintains a SNUGGLE position on O3 while X2 and X4 rotate into Helpside "I" positions. Near mid court X5 fakes trapping O1 and releases back to a SNUGGLE denial position on O5.
Note: when any time the shadow player X5 is unable to get into proper position, Shadow pressure is off and basic half court oriented SOS rules apply. Also, on any deep outlet or outlet into the middle of the floor, Shadow pressure is not feasible, and basic transition pressure defense is in effect.
Matching Up
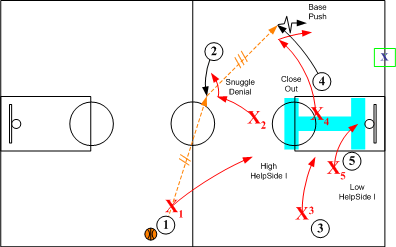
When O1 passes out to O2, X2 closes out and pushes O2 to sideline checkpoint. X4 closes out to O4 and assumes a SNUGGLE pass denial position. X5 sprint releases to the basket and guards O5. X3 drops into a low Helpside "I" position, and X1 takes a strong pass denial position against O1, preventing any return pass that would allow O1 to initiate the set offense.
Caution: It is extremely important that all close outs and rotations take place as the ball leaves the passer's hands.
If O2 passes ahead to O4, X4 assumes a SET position and pushes O4 to corner or baseline checkpoint. X5 FRONTS O5 in low post area. X2 creates "Box Pressure" by assuming a Snuggle pass denial position on O2. X1 and X3 take Helpside "I" positions.
Anytime the ball is advanced on dribble or pass to an area below the free throw line extended, SOS Base Go I or at the coach's discretion Base Go Red rules are in effect.
HOLD - Left Side
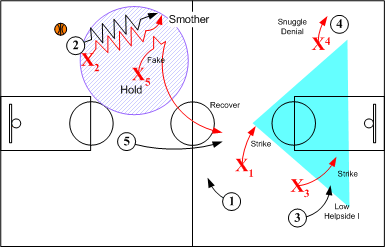
With X5 in a support "Shadow" position, X2 applies extreme pressure on ball hanlder O2, forcing O2 to near sideline checkpoint. X1, X3, and X4 move into a Helpside Triangle "I". Near mid court X5 fakes trapping O2 and releases back to a SNUGGLE denial position on O5.
Note: when any time the shadow player X5 is unable to get into proper position, Shadow pressure is off and basic half court oriented SOS rules apply. Also, on any deep outlet or outlet into the middle of the floor, Shadow pressure is not feasible, and basic transition pressure defense is in effect.
Matching Up
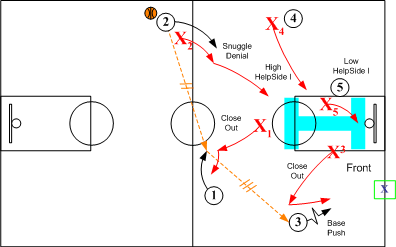
When O2 passes out to O1, X1 closes out and pushes O1 to sideline checkpoint. X3 closes out to O3 and assumes a SNUGGLE pass denial position. X5 sprint releases to O5. X4 drops into a low Helpside "I" position, and X2 takes a pass denial position against O2, preventing any return pass to O2.
Caution: It is very important that all close outs and rotations take place as the ball leaves the passer's hands.
If O1 passes ahead to O3, X3 assumes a SET position and pushes O3 to corner or baseline checkpoint. X5 FRONTS O5 in low post area. X1 creates "Box Pressure" by assuming a Snuggle pass denial position on O1. X2 and X3 take double Helpside "I" positions.
Anytime the ball is advanced on dribble or pass to an area below the free throw line extended, SOS Base Go I or at the coach's discretion Base Go Red rules are in effect.
Return to Defensive Strategies - Click Here
Return to HoopTactics - Click Here
© 2026 HoopTactics All Rights Reserved.
