- Offensive Techniques & Strategies

Red Same, Red Opposite, and Red Rover are SOS mid court disruptive scenarios that are used in short intervals to change tempo, create easy baskets and disrupt half court, execution of an opponent's set offense. Additionally, these mid court scenarios may be used to take the ball out of the hands of a good penetrating point guard. All of these half court SOS disruptions differ only on who becomes the initial trapping defender.
In these aggressive SOS half court disruptions, the ballhandler is trapped in the front court area near the sideline hash mark. As in the "Base Go Red" baseline trap scenario, the non-trapping players form a Triangle I. When a pass is made out of the mid court trap, as the ball leaves the passer's hands SOS "Near Player" rotations occur. SOS mid court disruptions end in either "Base Go Red" or "Base Go I" which is predetermined by the coach.
Click on desired half court press to view graphically illustrated details.

"Red Mid Same"
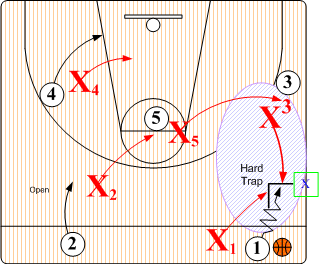
Hard Trap. Defensive player X1 pressures 3/4 court and forces dribbler O1 toward sideline checkpoint. X1 traps O1 with X3 near side hash mark. X5 rotates out and assumes a SNUGGLE denial position on O3. Defender X4 moves into a Low Triangle "I" position to deny any long lob pass to O4. X2 drops into a High Triangle "I" SNUGGLE position denying any pass to O5.
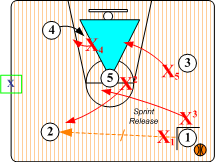
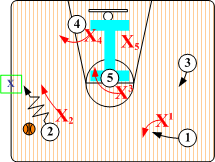
Close Outs. When O1 passes out of the trap to open O2, players rotate to the nearest offensive player. X2 closes out to O2, pushing O2 toward sideline checkpoint while X1 denies a return pass back to O1. X4 assumes a SNUGGLE denial on O4, X5 rotates into a low Helpside "I" position against O3 while X3 sprint releases on pass to high post O5.
Note: All rotations occur as ball leaves passer's hands.
Final Match Ups. Defender X2 pushes O2 to corner or baseline checkpoint. X4 assumes an aggressive low post fronting position against O4, defenders X1 and X3 maintain contact SNUGGLE denials on O1 and O5 While X5 assumes a Helpside "I" position. All basic SOS rules are in effect and rotate according to O2 actions. If O2 penetrates to the free throw line extended, "Base Go I" or "Base Go Red" rotations are initiated (coaches decision). If O2 feeds low post O4, "Post Front" trap rotations take place.
"Red Opposite"
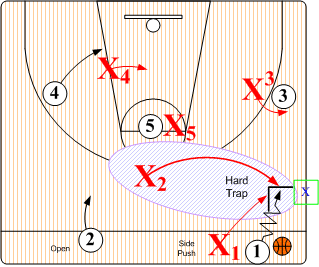
Hard Trap. Defensive player X1 pressures 3/4 court and forces dribbler O1 toward sideline checkpoint. X2 rotates over from baseline side and traps dribbler O1 with X1. X3 assumes a SNUGGLE denial position on O3. Defender X4 moves into to a Low Triangle "I" position to deny any long lob pass to O4. X5 assumes a High Triangle "I" SNUGGLE position denying any pass to O5.
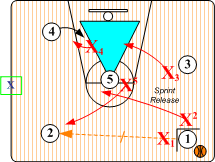
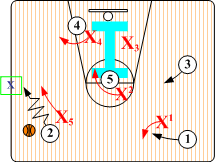
Close Outs. When O1 passes out of the trap to open O2, players rotate to the nearest offensive player. X5 closes out to O2, pushing O2 toward sideline checkpoint while X1 denies a return pass back to O1. X4 assumes a SUGGLE denial position on O4, X3 rotates into a low Helpside "I" position against O3 while X2 sprint releases on pass to high post O5.
Note: All rotations occur as ball leaves passer's hands.
Final Match Ups. Defender X5 pushes O2 to sideline checkpoint, and then utilizes an aggressive SMOTHER to disrupt O2's vision into the post area. Defender X4 assumes a low post fronting position against O4. X1 and X3 maintain contact SNUGGLE denials on O1 and O5 While X3 assumes a Low Helpside "I" position. All basic SOS rules are in effect and rotate rotate according to O2 actions. If O2 penetrates to the free throw line extended, based on the coaches decision, either "Base Go I" or "Base Go Red" rotations are initiated. If O2 feeds low post O4, "Post Front" trap rotations take place.
"Red Rover 4"
In the SOS half court "Red Rover" disruptions, a specific player is designated to trap the ball handler near the half court hash mark.
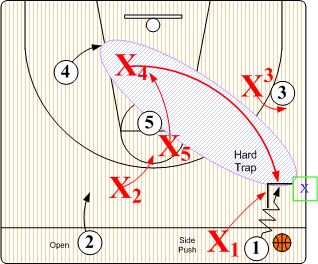
Hard Trap. In SOS "Red Rover 4" half court disruption, designated defender X4 goes out and traps the ball handler with X1. X2 assumes a High Triangle "I" SNUGGLE position denying any pass to O5. Defender X5 drops into to a Low Triangle "I" position to deny any long lob pass to O4. X3 assumes a SNUGGLE denial position on O3.
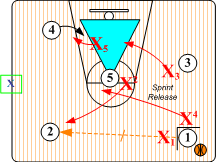
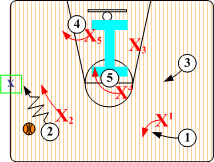
Close Outs.
hen O1 passes out of the trap to open O2, players rotate to the nearest offensive player. X2 closes out to O2, pushing O2 toward sideline checkpoint while X1 denies a return pass back to O1. Defender X4 sprint releases on pass to high post O5. X5 assumes a SNUGGLE denial position on O4 while X3 drops into a low Helpside "I" position against O3.
Note: All rotations occur as ball leaves passer's hands.
Final Match Ups. Defender X2 pushes O2 to corner or baseline checkpoint. X5 assumes an aggressive low post fronting position against O4, defenders X1 and X4 maintain contact SNUGGLE denials on O1 and O5 while X3 assumes a Low Helpside "I" position. All basic SOS rules are in effect and rotate according to O2 actions. If O2 penetrates to the free throw line extended, based on the coaches decision, either "Base Go I" or "Base Go Red" rotations are initiated.
"Red Rover 5"
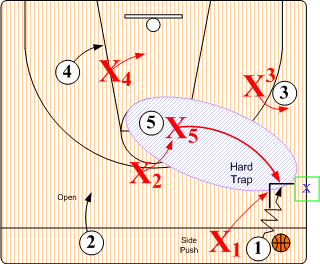
Hard Trap. In SOS "Red Rover 5" half court disruption, designated defender X5 steps out and traps the ball handler with X1. X2 assumes a High Triangle "I" SNUGGLE position denying any pass to O5. Defender X4 moves into to a Low Triangle "I" position to deny any long lob pass to O4. X3 assumes a SNUGGLE denial position on O3.
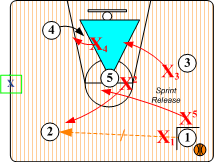

Close Outs. When O1 passes out of the trap to open O2, players rotate to the nearest offensive player. X2 closes out to O2, pushing O2 toward sideline checkpoint while X1 denies a return pass back to O1. Defender X5 sprint releases on pass to high post O5. X4 assumes a SNUGGLE denial position on O4 while X3 drops into a low Helpside "I" position against O3.
Note: All rotations occur as ball leaves passer's hands.
Final Match Ups. Defender X2 pushes O2 to corner or baseline checkpoint. X4 assumes an aggressive low post fronting position against O4, defenders X1 and X5 maintain contact SNUGGLE denials on O1 and O5 while X3 assumes a Low Helpside "I" position. All basic SOS rules are in effect and rotate according to O2 actions. If O2 penetrates to the free throw line extended, based on the coaches decision, either "Base Go I" or "Base Go Red" rotations are initiated.
Return to Defensive Strategies - Click Here
Return to HoopTactics - Click Here
© 2026 HoopTactics All Rights Reserved.
