
Match-Up Zone
| Rules | Application | Cutters | 1-3-1 Cuts | 2-3 cuts | 1-2-2 cuts | 1-4 cuts | Traps |
What you will discover or recall:
The Match-up zone defense combines both person-to-person and zone principles.
The true match-up zone is unique in that it utilizes a series of defensive rules.
In a Match Up zone, offensive alignments never split defenders, overloads are easier to defend, and opponents have a tendency to get confused.
Success is dependent on smart, knowledgable players and communication.The Match-up zone defense combines both person-to-person and zone coverage. Although most zones eventually end up in a match up, the true match-up zone is unique in that it utilizes a series of defensive rules. As a result, offensive alignments never split defenders, overloads are easier to defend, and opponents have a tendency to get confused. It's ultimate success is dependent on smart, knowledgable players and communication. A match-up zone is a passive defense reacting to offensive movement and allowing perimeter ball movement. However, it can be supplement with agressive traps.
One of the biggest advantages of the match-up zone is that it can dictate offensive alignment. If you want to force the opponent into a one guard front alignment, then show a two guard zone the first possession, and then apply match-up rules. If you want to force a two guard offensive alignment, show a 1-2-2 or 1-3-1 zone the first possession and then switch to match-up zone rules.

Basic Match-up Rules
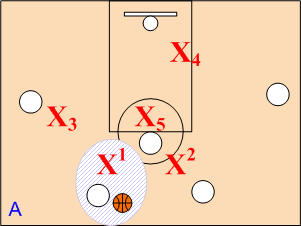
Generally, X1 will be the point guard, X2 the shooting guard, X3 the small forward, X4 the power forward and X5 the post player. However, these match-up assignments may be adjusted to a team's specific player personnel.
-
Defender X1, takes the point with or without the ball. If there is a two guard front alignment, X1 takes the player on the right side (facing away from basket).
-
Defender X2, takes first player to left of X1.
-
Defender X3, takes first player to right of X1.
-
Defender X4, baseline defender, takes second player to the right or left or X1 according to the opponents offensive alignment.
-
Defender X5, takes the center or if there is no post, takes baseline player on right side of X1.
Application of the Match-up Rules
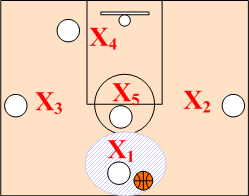
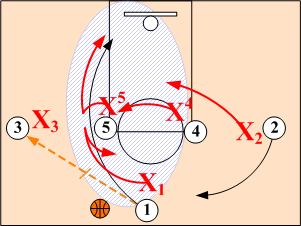
vs 2-3 Offensive Alignment
Defender X1 takes player on right side with or without ball (two guard front)
Defender X2 takes first player to left of X1.
Defender X3 takes first player to right of X1
Defender X4 takes second player to left of X1
Defender X5 takes post

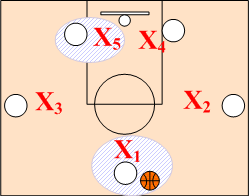
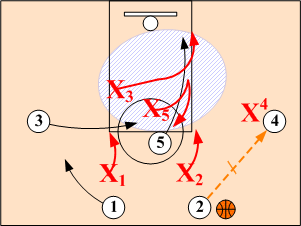
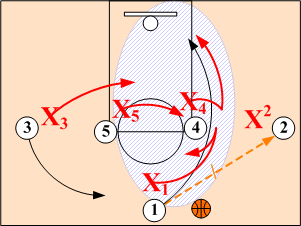
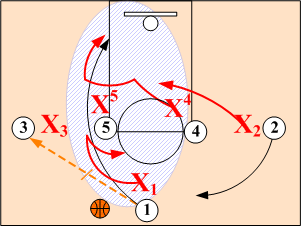
vs 1-3-1 Offensive Alignment
Defender X1 takes point
Defender X2 takes first player to left of X1
Defender X3 takes first player to right of X1
Defender X4 takes second player to right of X1
Defender X5 takes post

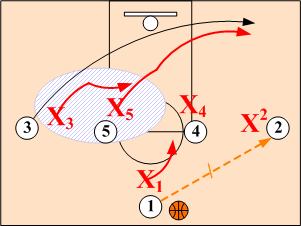
vs 1-2-2 Offensive Alignment
Defender X1 takes point
Defender X2 takes first player to left of X1
Defender X3 takes first player to right of X1
Defender X4 takes second player to left of X1
Defender X5 takes baseline player on right side (no post).

vs 1-4 Offensive Alignment
Defender X1 takes point
Defender X2 takes first player to left of X1
Defender X3 takes first player to right of X1
Defender X4 takes post on left side.
Defender X5 takes post on right side
Defending Cutters
If opponents would use just a stationary overload or 1-3-1 alignment to attack zones, the match-up would be easy. However, most opponents will deploy cutters and screens when attacking zone defenses. The match-up zone defends basket cuts by switching with a weakside defender. The defender, guarding the cutter, denies the cutter for three steps before switching with the weakside defender.
However, on certain cuts, defenders can stay with cutters and just interchange roles (asignments) instead of switching. This makes defending certain cuts much easier and can be very confusing to the offense. However, it does result in players having to play multiple positions within the match-up zone.
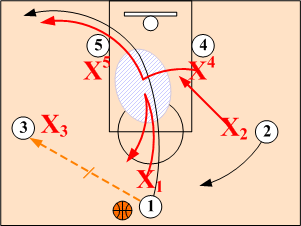
Defending Cuts 1-3-1 Offensive Alignment
Defending Point Cut

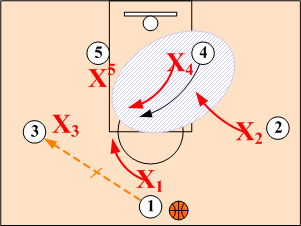
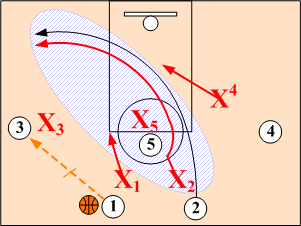
Point & Baseline Runner Switch
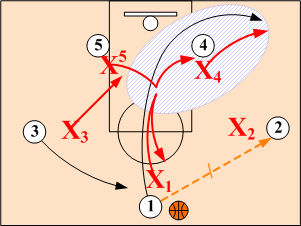
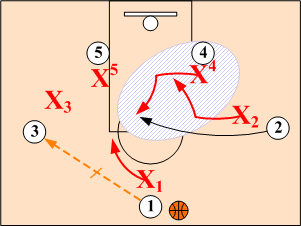
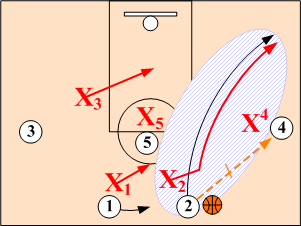
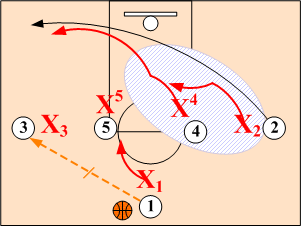
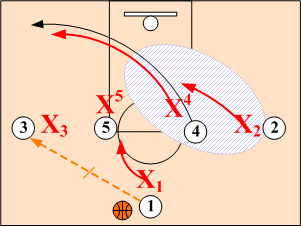
X1 denies point's basket cut, switches with X4 and then pops back out to elbow. X2 sags off on weakside and X3 pressures ball handler. X4 switches to cutter O1 while X5 denies post passes.

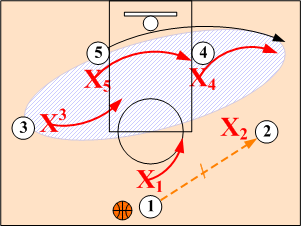
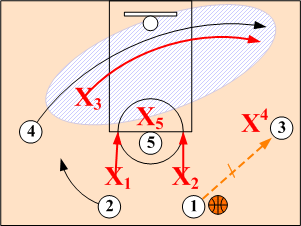
Point and Baseline Runner Switch
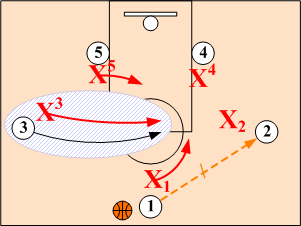
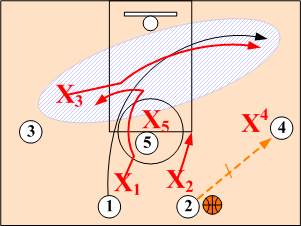
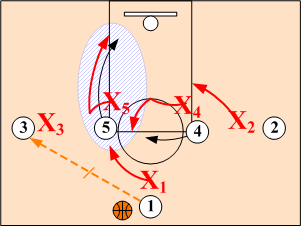
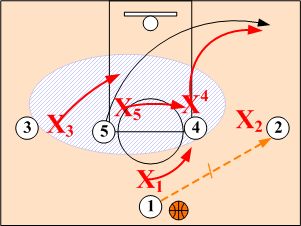
X1 switches with X4 and pops back out. X2 pressures ball handler and X3 sags off to O4 on weakside. X4 sagged off, switches with X1 and assumes a pass denial position on cutter O1. X5 denies post passes.
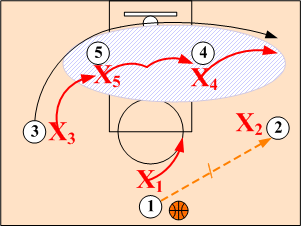
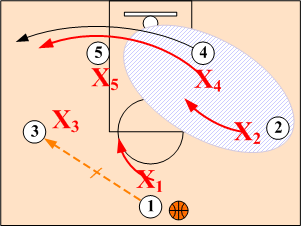
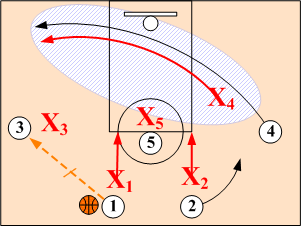
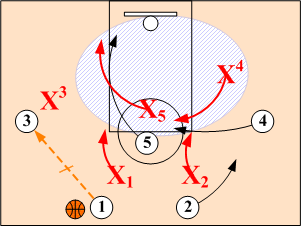
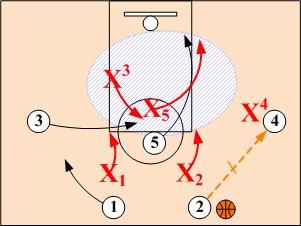
Defending Ballside Wing Cut

X3 & X2 Switch
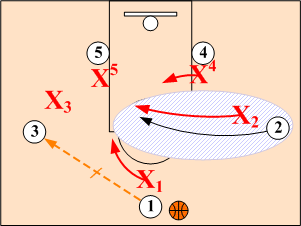
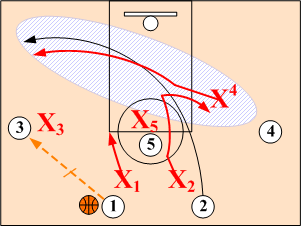
X1 drops to elbow. X2 sags off on weakside and picks up cutter O3. X3 denies O3's cut and swithching with weakside defender X2. X4 pressures ball handler O4 and X5 denies post passes.

X2 & X3 Switch
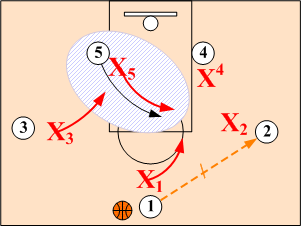
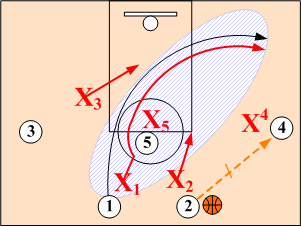
X1 maintains elbow position ready to pop out to O3
X2 switches with weakside defender O3 and then pops back out
Sagged off X3 switches to cutter O2 & assumes a helpside position
X4 pressures ball handler O4
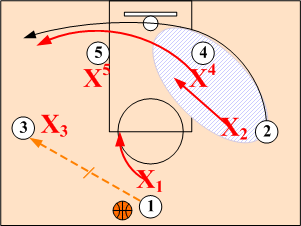
X5 denies post passDefending Weakside Wing Cut

X3 & X4 Switch
X1 drops to elbow
X2 pressures ball handler O2
X3 sags off and switches with baseline defender X4
X4 switches with X3 and assumes a pass
denial postion on weakside cutter O3
X5 denies post pass
X2 & X4 Switch
X1 drops to elbow
X2 sags off on weakside and switches with X4
X3 pressures ball handler O3
X4 switches with X2 and assumes a pass
denial postion on weakside cutter O2
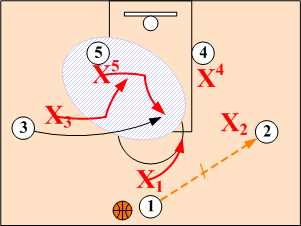
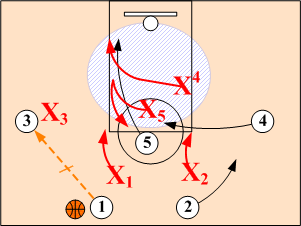
X5 denies post passHigh Post Rolls

Defenders X4 and X5 switch
X4 sagged off on weakside switches to O5
X5 switches and takes O4
X1 drops to elbow, X2 sags off on weakside
X3 pressures ball handler
Defenders X4 and X5 Switch
X4 sagged off on weakside switches to O5
X5 switches to O4 breaking up to high post
X1 and X3 sag off while X2 pressures ballhander 02.
High Post Roll Interchange Adjustment:

X4 & X5 Interchange
When X4 and X5 are similar type players, instead of switching defenders X4 and X5 change roles. Defender X5 stays with O5 and becomes the baseline defender, taking the second player to the left of point X1. Defender X4 becomes the high post defender.
Defending Cuts 1-2-2 Offensive Alignment
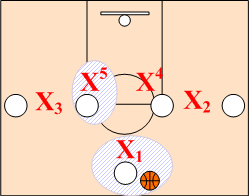
The 1-2-2 offensive alignment is used primarily to flash players into the middle. In matching up to the 1-2-2 alignment, according to rule X5 matches up with the baseline player to right of point.
Defending Point Guard Cuts
Point & Weakside Post Switch (Left)
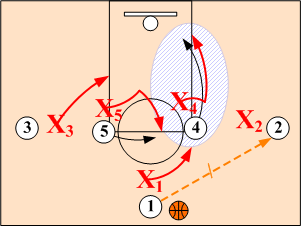
X1 denies O1's initial basket cut, switching with weakside defender X4. X2 drops down to O4 while X1 pops back out to elbow. X3 pressures ball handler while X5 denies low post O5.
Point & Posts Interchange (Right)
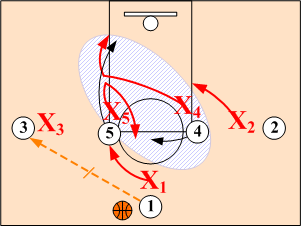
X1 denies O1's basket cut, switching with weakside defender X5. X5 in turn switches with X4. X3 drops down to O5 while X1 pops back up to elbow. X2 pressures ball handler.
Defending Weakside Wing Baseline Cuts
Weakside Wing Baseline Switch (Left)
Defender X3 switches with X5 on O3's weakside cut. X5 in turn switches with X4 and defends O4 in low post. X1 drops to elbow while X2 pressures the ball handler.
Weakside Wing Baseline Switch (Right)
X2 switches with X4 on O2's weakside cut. X1 drops to elbow while X3 pressures the ball handler. X5 denies post passes. Basic match-up rules apply.
Defending Weakside Wing Flashes
Weakside Wing Flash Switch (Left)
Post X5, sagged off on weakside switches with X3 contesting O3's flash cut. X3 assumes a sagged off position on X5. X1 drops to elblow while X2 pressures the ball handler. X4 denies low post O4.
Weakside Wing Flash Switch (Right)
Sagged off X4 switches with X2 on O2's flash cut to middle. X2 assumes a helpside position on O4. X1 drops to elbow while X3 pressures the ball handler. X5 defends the low post.
Wing Post Interchange Adjustment
Weakside Wing Flash Interchange (Left)
Weakside wing defender X3 denies O3's flash into post, interchanging positions with X5. X5 assumes weakside help position. X1 sags off on while X2 pressures the ball handler. X4 remains baseline defender.
Weakside Wing Flash Interchange (Right)
Weakside wing defender X2 denies O2's flash into middle. X1 drops to elbow and X4 assumes a weakside help position on O4. X3 pressures ball handler while X5 defends low post O5.
Defending Post Flashes
Post Flash (Left)
Basic match-up rules apply. X5 denies O5's flash into middle. X2 pressures the ball handler. X1 and X3 sag off while X4 matches up on baseline.
Post Flash (Right)
Defenders X4 and X5 interchange positions. X4 denies O4's flash into post. X5 becomes baseline defender. Defenders X1 and X2 sag off. X3 pressures the ball handler.
Weakside Post Baseline Cut
Post Baseline Cut Switch (Left)
Defender X5 and X4 switch. X1 and X3 sags off while X2 pressures the ball handler.
Post Baseline Cut (Right)
Basic match-up rules apply. Defender X4 stays with O4 maintaining baseline role. Defenders X1 and X2 sags off while X3 pressures the ball handler.
Defending Cuts 2-3 Offensive Alignment

Defending cutters out of a 2-3 offensive alignment are a little more complicated than a one guard alignment in that it entails interchanging positions rather than switching. However, in most cases, against a two guard alignment, by playing a straight 2-3 zone on the first defensive position, it will force the offense into a one guard offensive alignment.
Defending Ballside Guard Cuts
Point & Wing Interchange (Left)
X1 denies O1's basket cut, interchanging positions with X3. X2 and X4 sags off on weakside while X3 pressures ball handler. X5 denies post passes.
Point & Wing Interchange (Right)
X2 denies O2's basket cut, interchanging positions with X4. Defenders X1 and X3 sags off on weakside while X4 pressures ball handler. X5 denies post passes.
Defending Weakside Guard Cuts
Guard & Wing Switch (Left)
X1 switches with X3 on O1's weakside cut. X3 assumes baseline role. Defender X2 becomes point and drops to elbow while X4 pressures the ball handler. X5 denies post passes.
Guard & Wing Switch (Right)
X2 switches with X4 on O2's weakside cut. X1 drops to elbow while X3 pressures the ball handler. X5 denies post passes. Basic match-up rules apply.
Weakside Interchange Adjustment
X1 & X3 Interchange (Left)
Defender X1 stays with O1 on weakside cut assuming baseline role. X2 becomes point dropping to elbow. X3 sags off on weakside while X4 pressures the ball handler. X5 denies post passes.
X2 & X4 Interchange (Right)
X2 stays with O2 on weakside cut assuming baseline position. X1 drops to elbow while X3 pressures the ball handler. X4 sags off on weakside wing and X5 denies post passes.
Defending Weakside Wing Cuts
Weakside Wing Interchange (Left)
Weakside defender X3 goes with O4, interchanging positions with X4. X1 and X2 sags off on while X4 pressures the ball handler. X5 denies post passes.
Weakside Wing (Right)
Weakside wing defender X4 goes with O4. X1 and X2 sags off on while X3 pressures the ball handler. X5 denies post passes. Basic match-up rules apply.
Defending Post Roll Cuts
Post & Wing Switch (Left)
X5 switches with X4 on O5's roll to basket. Defenders X1 and X2 sag off. X3 pressures the ball handler while X5 takes O4 flashing into high post. Basic match-up rules apply.
Post & Wing Switch (Right)
X5 switches with weakside defender X3 on O5's roll to basket. Defenders X1 and X2 sag off. X3 pressures the ball handler while X5 takes O3 flashing into high post.
Post Interchange Adjustment
When X3, X4 and X5 are physically similar, they can simply interchange positions rather than switching. Interchanging positions affords easier match ups and can be very confusing to the offense.
X4 & X5 Interchange (Left)
Defender X5 stays with O5 assuming baseline role. X4 stays with O4 assuming post position. X1 and X2 sags off while X3 pressures the ball handler.
X3 & X5 Interchange (Right)
Defender X5 stays with O5 assuming baseline role. X3 stays with O3 assuming post position. X1 and X2 sags off while X4 pressures the ball handler.
Defending Cuts 1-4 Offensive Alignment
The 1-4 offensive alignment takes advantage of two agile post players who can shoot from the outside. This quick hitting alignment makes it difficult for the traditional zone defenses to match up. However, since the match-up zone uses rules, the 1-4 alignment does not pose a problem. In matching up to the 1-4 alignment, according to rule, X5 will match up with the post to right of point.
Since the 1-4 alignment pulls the defense away from the basket and opens up the baseline for back cuts making it a good counter measure against pressure defense.
Defending Point Guard Cuts
Post, Point & Weakside Post Switch (Left)
X1 denies O1's initial basket cut and switches with ballside post X5. Weakside post X4 switches to post O5. X2 drops to a weakside help position on post O4 while X1 pops back out to elbow. X3 pressures ball handler.
Post, Point & Weakside Post Switch (Right)
X1 denies O1's initial basket cut and switches with ballside post X4. Weakside post X5 switches over to post O4. Defender X3 drops to a weakside help position on post O5 while X1 pops back out to elbow. X2 pressures ball handler.
In the event that you want to keep a big post X5 in the post area, the point defender X1 switches with the weakside post defender X4 who has sagged off. Weakside wing X2 switches to O4.
Defending Weakside Wing Baseline Cuts
Weakside Wing Baseline Switch (Left)
Defender X3 switches with X5 on weakside wing O3's baseline cut becoming the baseline defender. X4 defends post O4. X1 drops to elbow while X2 pressures the ball handler.
Weakside Wing Baseline Switch (Right)
Defender X2 switches with X4 on weakside wing O2's baseline cut. X5 defends post O5. X1 drops to elbow while X3 pressures the ball handler.
Defending High Post Rolls
>
Post Roll (Left)
Ballside post defender X5 disrupts O5's post roll becoming baseline defender interchanging roles with X4. X4 becomes post defender while X2 and X1 sag off. X3 pressures ball handler.
Post Roll (Right)
Ballside defender X4 disrupts O4's basket roll. All basic match-up rules apply.
In the event that you want to keep a big post X5 in the post area, the ballside post defender X5 switches with the weakside post defender X4.
Defending Weakside Post Cuts

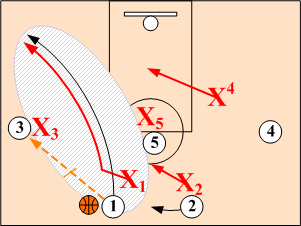
Weakside Post Cut (Left)
Defender X5 goes with cutter O5 becoming baseline defender interchanging roles with X4. X1 and X3 sag off and X2 pressures ball handler.
Weakside Post Cut (Right)
Defender X4 goes with cutter. Basic match-up rules apply.
In the event that you want to keep a big post X5 in the post area, the weakside post defender X5 can switch with the ballside post defender X4.
Trapping Out of the Match-Up Zone
The basic match-up rules can easily be extended into full and half court with trapping being applied any time the ball enters a primary trap zone (corner). Trapping can be used as a strategic maneuver to catch the opponent off guard, such as after a timeout or on a free throw. When behind late in the game, trapping becomes a necessity.

-

