


The Case for the Defense
The High Post Split Offense is comprised of a high post split followed by down screens. Since the high post player is isolated in the middle of the floor, they need to be well trained in skills and techniques of guarding a high post player with and without the ball.
Defenders must, also, be prepared to defend the High Post Offense's initial guard splits. Regardless of the technique being use, on the pass to the high post, the defenders guarding the cutters sag off in front of the high post.
Since the High Post offense deploys the tactic of a big player setting a screen to free up shooters and to create mismatches, defenders must have a working knowledge of how to disrupt and counter down screens along with possessing strong low post defensive skills.
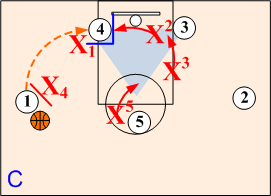
Base Cross Schematic Sequence

Defensive Fundamentals Required
 Defending the High Post Techniques
Defensive Strategies Used To Combat the High Post Offense


Basic NBA Show & Recover
Defending the high post split offense involves two phases: a high post split followed by down screens. In defending the high post split, the defense will sag off in front of the post forcing the cutters wide. In defending the down screens, since the down screens involve a "Big" screening against a "Little," most NBA teams will "Show & Recover." They do not like to switch. If the defense switches, it allows the screener to post up against the smaller defender.
Phase 1. Defending the High Post Split
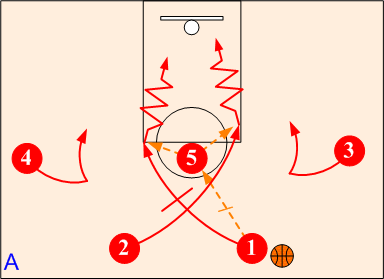
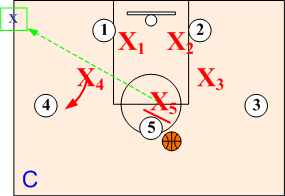
When the ball is passed to the high post the ball defenders sag off. Guards O1 and O2 sag off to a defensive position one stride in front of the high post. Wings O3 and O4 sag off to a help position with one hand pointing to their opponent and the other towards the ball. Once the high post receives the ball, the post defender X5 drops off and assumes a defensive position an arms length away between the high post and the basket protecting against the guards splitting.
The guards, in a sagged off position in front of the post, prevent any hand off and drives by not permitting either offensive guard to cut between them. The sagged off wings X3 and X4 along with the high post defender X5 also prevents any handoff and direct path to the basket.

When the high post turns and faces the basket, defender X5 steps up and jams the high post, preferably, forcing them toward the corner pushpoint of their weakhand.
Phase 2. Defending Down Screens
Show
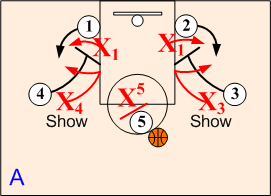
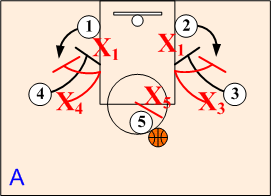
Defensive player X5 pressures and forces the high post toward the corner pushpoint. Defenders X3 and X4 step out and "SHOW", forcing the shooters coming off O3's and O4's down screens wide. Defenders X1 and X2 chase out hard against O1 and O2.
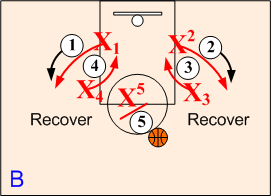
Recover
Defenders X4 and X5 release and RECOVER (dive back) to assuming a three quarter pass denial position against posts O3 and O4 while defenders X2 and X3 chase out and assuming strong pass denial positions against shooters O2 and O3. Post defender X5 pressures the high post forcing them toward the corner push point.
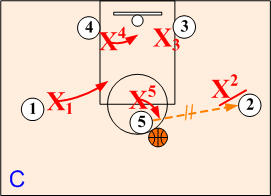
Matching Up
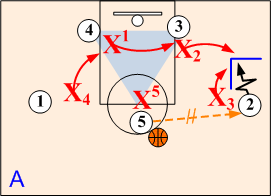
If high post O5 passes the ball to O2 on wing, all basic defensive principles apply. Defender X2 pressures the ballhandler hard. Defender X3 assumes a three quarter or behind defensive position against O3 post physically pushing O3 away from the low block area. In defending the low post area most NBA teams have options to front, trap the post, or play straight up in post area. Weakside players X1 and X4 "pack" in toward the ball maintaining ball/man vision.
All Out "SOS" Disruption
Basic SOS Pressure Defense will first disrupt the high post offense by aggressively pushing the ballhandler to the near sideline checkpoint. In defending the high post split, the defense will switch. Defenders will also switch on the down screens assuming strong pass denial positions. Defenders will trap on passes to the wing or into the low post.
Phase 1. High Post Feed Disruption
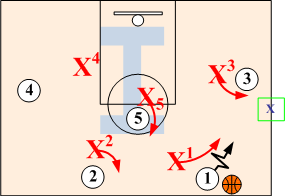
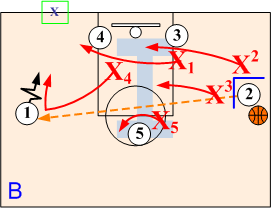
In defending against the high post offense, SOS defense's first line of defense is to pick up the ballhandler early, preferably in the backcourt, and push them away from the high post area using a hard sideline push. The post defender X5 assumes a strong snuggle denial preventing any direct pass to the high post. Ballside wing defender X3 assumes a snuggle denial on O3 while the weakside wing defender X4 assumes a strike position.
Phase 2. Defending the High Post Split

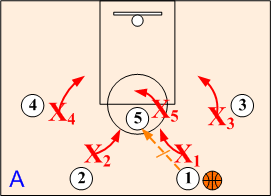
When the ball is passed to the high post the ball defenders sag off. Guards O1 and O2 sag off to a defensive position one stride in front of the high post. Wings O3 and O4 sag off to a help position with one hand pointing to their opponent and the other towards the ball. Once the high post receives the ball, the post defender X5 drops off and assumes a defensive position an arms length away between the high post and the basket protecting against the guards splitting.
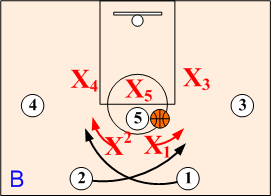
The guards, in a sagged off position in front of the post, prevent any hand off and drives by not permitting either offensive guard to cut between them. When the guards split the defenders switch forcing the cutters wide.
When the high post receives the basket ball, defender X5 assumes a hard smother with feet in toe heel and push to left corner check point. Wing defender X4, on the left side, assumes a snuggle denial position while the opposite wing O3 assumes a drop off strike position
Phase 3. Defending Down Screens
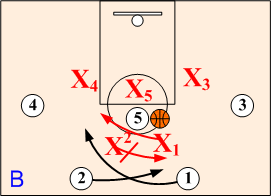
"Contact" switches take place on the down screens. Defenders X3 and X4 step out and physically block shooters O1 and O2 coming off the down screens.

Matching Up: Defenders X1, X2, X3 and X4 assume strong pass denial positions denying entry passes to wings O1 or O2 coming off screens, and feeds into O3 and O4 in low post areas. Defender X5 smothers O5 forcing to left corner checkpoint.
Phase 4. Double Teaming
Wing Trap
When point passes to shooting guard O2 on wing, X3 assumes an on ball "SET" position, influencing O2 to corner or baseline checkpoint. Post defender X2 steps out and double teams O2 with X3 as O2 receives the pass. Defensive player X1 rotates over to a post front position and denies any pass to O3. Weakside defender X4 drops down to the Low Triangle "I" position, and X5 assumes a High Triangle "I" position against high post O5.
Pass Out of Trap
All rotations must take place as ball leaves passer's hands.
When O2 passes out of the trap to open O1 on weakside wing, X4 closes out and assumes an on ball SET position forcing O1 to baseline. Defender X1 rotates back and FRONTS O4 in the low post area. X5 releases to a Low Helpside "I" position against the O3 and X3 rotates to a Mid Helpside "I" position. Post defender switches sides maintaining a strong pass denial on high post O5.
Defenders then rotate according to O1's actions. If O1 drives base, "Base Go I" or at the coach's discretion, "Base Go Red" scenarios are in effect.
Post Trap
If wing O1 passes over X1's post front, defender X3 covers and traps O4 with X1 while X2 drops to Low Triangle"I" positon while X5 moves into the Top of the Triangle "I" position ready to close out to O2 or O5.
If screening game is initiated, basic SOS defensive rules are in effect.
