


The Case for the Defense
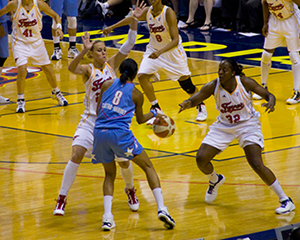
For any defense that is not well prepared in defending strong side down screens, the Zipper offense will be very difficult to stop. In addition, if the on ball defender should get careless it will most certainly result in an easy layup.
Defensive Fundamentals Required
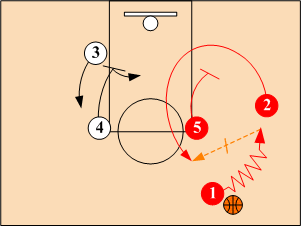
Zipper Schematic Sequence

Defensive Strategies & Techniques Used To
Combat the Zipper Offense


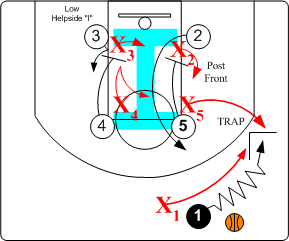
Basic NBA Show & Recover
Since the Zipper's ballside down screen involves a "Big" screening against a "Little," most NBA teams do not like to switch. If the defense switches, the screener will simply post up against the smaller defender.
Phase 1: Show (cutter forced inside)
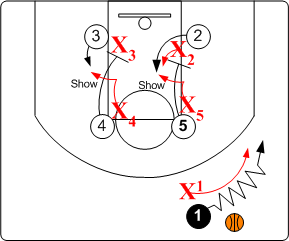
Whenever posssible, defensive player X1 forces the point guard O1 to weakest hand. Defensive players X4 and X5 step out in O2's and O3's paths (SHOW) forcing them wide off O4's and O5's down screens. X2 and X3 chase out around the screens and then attempt to deny passing lanes to O2 and O3.
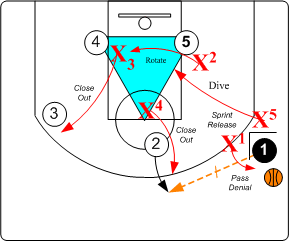
Phase 2: Recover
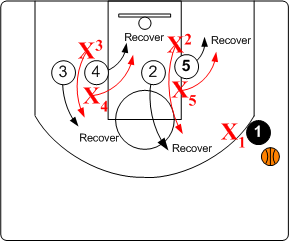
Defensive player X1 smothers O1 when dribble is stopped. X4 and X5 RECOVER and deny passing lanes to O5 and O4. Defenders X2 and X3 close out to pass denial positions against O2 and O3.
Phase 3: Final Match Up
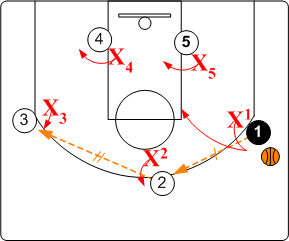
When O1 passes to O2, X2 denies penetration and shot by O2, while X1, X3, X4 and X5 deny passing lanes to O1, O3, O4 and O5 respectively. When O2 passes to O3, X3 denies penetration while pressuring pass to post O4. X4 attempts to physically push O4 away from low post block and plays straight up with teammates collapsing into 3 second area to help if needed.
Note: Post defenders usually attempt to force posts to shoot a rushed turn around jump shot or pass out when the other defenders collapse deep into post area.
All Out "SOS" Disruption
Total disruption of the Zipper offense is achieved by having the defense initiating the action and trapping the ball handler on the wing. The point guard is vulnerable to this wing trap because of the down screen taking place on ball side. However, to be totally effective, however, both SOS individual defensive fundamentals and basic team concepts must be applied.
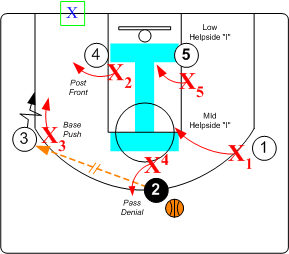
Phase 1: Sideline Trap
Defensive player X1 pushes the point guard O1 to sideline checkpoint. Defender X5 steps out and traps O1 with X1 above the free throw line extended. Defender X2, after executing a contact switch with X5, fronts the post O5. X4 moves to High triangle I position ready to closeout on O2. X3 assumes a low Helpside "I" position denying any pass to O4 in basket area.
Phase 2: Pass out of the trap
When O1 passes to O2, X4 closes out to O2, pushing O2 toward sideline checkpoint while X1 denies a return pass back to O1. X5 sprint releases on pass and rotates down to O5 as X2 moves across to O4. X3 closes out to a pass denial position against O3.
Note: All rotations must take place as ball leaves passer's hands.
Phase 3: Final Match Up
When O2 makes a pass to O3 on wing, X3 closes out to O3 pushing O3 to corner or baseline checkpoint. X2 fronts the low post O4 while X1 and X5 drop into Helpside "I" positions against O1 and O5. X4 assumes a pass denial position against 02. When matched up, basic SOS defensive principles are in effect. If O3 does drive baseline, "Base Go I" rotations occur.
Note: Whenever possible in the Helpside " I" defenders X4 and X1 should invert positions with X1 assumming a SNUGGLE position on O2 and X4 dropping into the Mid Helpside "I" position.
