
Attacking a Diamond & One Defense
"Triangle (1-3-1) Offense"
One of the simplest way to attack the Diamond & One Combination defense is to place the "Star" player in the middle and attack it like a 1-3-1 zone. Therefore, the Triangle offense is also an effective way of isolating a star player 1-on-1 in the middle. In most cases, the Star's defender will be very skilled in strong pass denials, but ill prepared for post defense. In addition, it produces wide open looks, easy lay-ups and offensive putbacks. It will definitely force any opponent out of a Diamond & One defense.
| HP Isolation & Triangle Action | Kick Out & Flash | Lob Exchange | Implementation | Case for Defense |
Offensive Fundamentals Required
Schematic Sequence


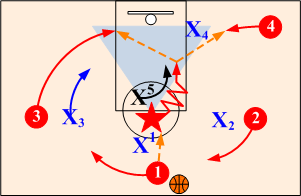
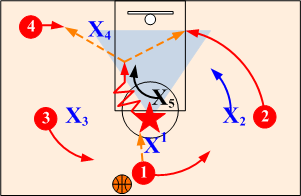
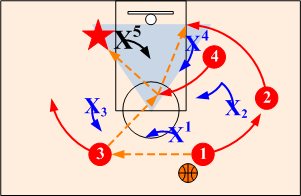
High Post Entry
When the Star receives the ball on the high post, it initiates inside triangle action. When the Star receives the ball on the high post, they are basically isolated one-on-one against the "Chaser." Since chasers' responsibility is primarily pass denial, they are usually unprepared for high post defense. On the pass into the high post, baseline player O4 assumes a short corner position and the weakside wing assumes a low post position. The other two outside players rotate into a two guard front.
First Look - High Post Isolation & Triangle Action
Drive Right
When the Star drives right, they drop pass options to O3 or O4 for easy layups. O1 and O2 rotate into a two guard front alignment.
Drive Left
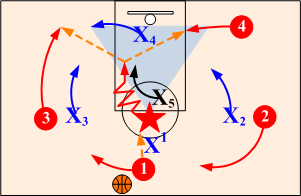
When the Star drives left, the ballside wing drops to a short corner position and the baseline player assumes the low post position. O1 and O2 rotate into the 2-1-2 alignment.
Second Look - Kick Out Pass & Flash
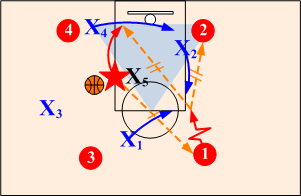
Kick Out Pass
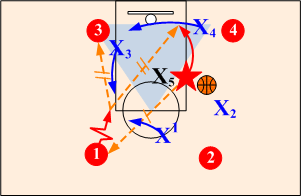
When a good shot is not available off the inside triangle action, the Star makes a kick out pass to either O1 or O2 for an open shot or dribble penetration.
Post Flash
If feeds to O3 or Star are unavailable, O4 flashes into middle. O4 has option of shooting or passing to O3 or Star. O1 and O2 flair (line of sight) on wings for open spot up shots.
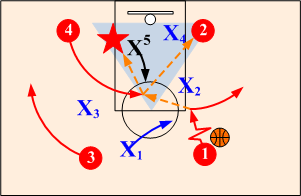
Left Alignment
Drive Left
When the Star drives left, they have drop pass options to O2 or O4 for easy layups. O1 and O3 rotate into a two guard front alignment.
Drive Right

When the Star drives right, the ballside wing drops to a short corner position and the baseline player assumes the low post position. O1 and O3 rotate into the 2-1-2 alignment.
Kick Out Pass
When a good shot is not available off the inside triangle action, the Star can makes a kick out pass to either O1 or O3 for an open shot or dribble penetration.
Left Flash
If a good shot in not available or feeds to O2 or Star are unavailable, O4 flashes into middle. O4 has option of shooting or passing to O2 or Star. O1 and O3 flair (line of sight) on wings for open spot up shots.
Lob Exchange vs. Defensive Overplay
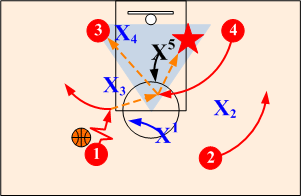
High Post Lob
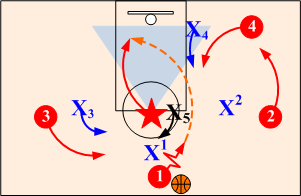
Anytime the Star's defender X5 overplays the pass into the high post, the Star releases opposite to the basket looking for a lob pass from the point.
Post Flash
When the lob pass in not available, O4 flashes to middle. O4 has option of shooting or passing to O2 or Star. O1 and O3 flair (line of sight) on wings for open spot up shots.
Implementation

Like any offense, the key to the success of the Diamond & One Triangle Offense is in its execution and coordination. Players need to be well prepared to execute high post isolations, back cuts, interior passing and spot up shots. In addition, players have to think and function as one unit. This requires proper defensive recognition, non-verbal communication, timing and experience.
Breakdown Drills:
 1-on-1 Drill: Low Post Isolation
Game Strategies

Scout your opponent if possible. Players need to know what reads to expect during the game. Opponents will generally use only a primary and secondary defense technique in defending screens and post ups. In addition, to their defensive schemes, observer their player match ups. Educate and explain the anticipated defensive reads and their counters. When scouting is not possible, scout your opponent during the game.

Be conscience and alert to any defensive changes or adjustments, especially after substitutions and timeouts. Don't hesitate in deploying various alignments and entries during the game so that defenders cannot focus on defending just one set. Move players around and attack the weakest defenders.

Diamond & One Defense
A derivative of the Box & One combination defense, the "Diamond & One" four defenders zone while the fifth player assumes a strong pass denial position against the opponents scoring ace. The Diamond & One alignment is best deployed when the opponents use an odd or one guard front offense.
To learn more about the Diamond & One Defense - Click Here

Return to Combination Offenses - Click Here
Return to Offensive Strategies - Click Here
Return to HoopTactics - Click Here