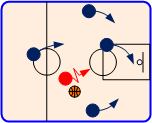
Early Offense Phases
| Early Push | Early Flow | Early Continuity |

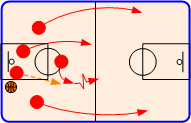
Phase 1: Early Push

The initial push phase into offense end of the court before the defense can get organized and establish proper player match ups, creates not only out numbered situations, but severe mismatches as well. Early push prevents or hinders any preplanned defensive disruption scenarios by forcing the defense to "react" rather than "act." When the offense is able to get the ball into the offensive operating area within 2 to 4 seconds, most often the defenders are spread out creating space where good 1-on-1 creativity has a chance to produce a high percentage field goal attempt.
| Attacking Out Numbered Situations | Proven Fastbreak Attacks |
Attacking Out Numbered Situations
"You Must Score to be Successful"
Coaches, on all levels, should not make the mistake of assuming and taking for granted that players are skilled in attacking out numbered situations. In fact, there are very few coaches that actually take the time to teach or reinforce the fundamentals and principles required to successfully attack out number situations. Failure to take advantage and capitalize on these situations will not only make the difference in winning or losing close games, it will also cancel any great defensive effort that created the out numbered situation in the first place.
Do not leave attacking out numbered situations to chance. Situations that need to be addressed: Break-Aways, 2-on-1, 3-on-1, 3-on-2, and 3-on-3
Principles and Techniques of Attacking Out Number Situations
Click on desired read below to view illustrated attack option.
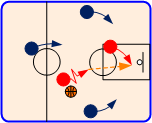
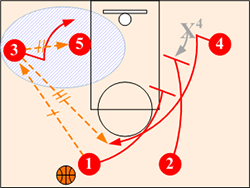
Break Aways (1-on-0 / 2-on-0) - Goal: Layup and steal
Attacking 2-on-1 Situations - Goal: Layup
Attacking 3-on-1 Situations - Goal: Create a 2-on-1 situation
Attacking 3-on-2 Situations - Goal: Open jumper and putback
Attacking 3-on-3 Situations - Goal: Create a 3-on-2 situation
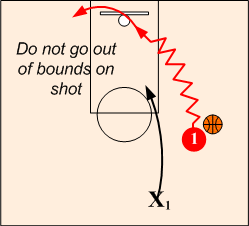
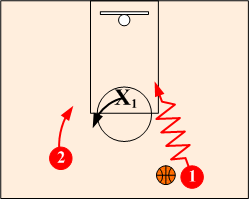
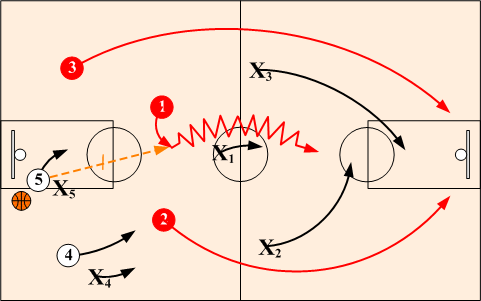
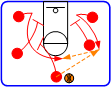
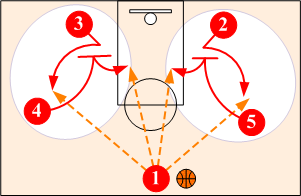
Break Aways (1-on-0, 2-on-0)
Main Objective: Lay up shot and steal
On all breakaways, it is imperative that you score. It is important that the player take as few dribbles as possible to get to the basket in order to prevent any defensive pursuit ("Wolf") catching up with them from behind. Teammates should attempt to cut off defensive pursuit and/or get into rebounding position to follow up on any missed shot.
A five-on-zero (5-on-0) situation should never occur. The last two players, trailer and safety, should not go beyond half court assuming defensive responsibilities to prevent any counter break if the ball is turned over on the break away or ready to apply full court pressure after a successful basket.
Finishing
Players should be taught to go in hard to the basket and lay the ball up soft staying inbounds after shooting the lay up. Staying inbounds will force the shooter to go vertically on the shot rather than just throwing it up (vomiting) they run under the basket. When coming from a wing angle shooters should also stay above the block so that they can easily use the backboard on the shot.
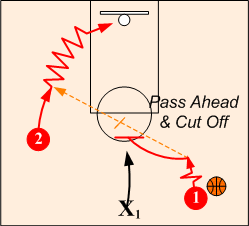
Pass Ahead
On all breakaways, whenever possible, players should pass the ball ahead. This will allow the ball to get to the basket quicker and an easier shot. The passer will also be able to cut off any defensive pursuit and be in position to rebound any missed shot.
NOTE: This situation brings out the "character" of a team. If a player dribbles selfishly to the basket instead of passing to a teammate ahead, you have real problems.
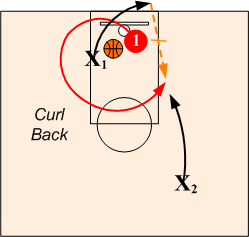
Solo Press
In most cases, after giving up an easy break away on a solo layup, the opponents are frustrated and disorganized, and, as a result, are very careless in bounding the ball (taking ball out with back to court, wrong player taking it out, etc). This provides an excellent opportunity for the shooter to curl around and steal the inbounds pass.
CAUTION: Missed Layups
Basketball is a game of habits. Missed layups during a game can be traced directly back to practice. Therefore, do NOT ignore or tolerate missed layups in practice.
Automatic 10 Push ups Rule
Anytime a layup is missed in any drill, the player has automatic 10 push ups If a passer is involved on the missed layup, they too have 10 push ups Players will quickly understand the importance of making layups (finishing) and start taking missed layups very seriously.
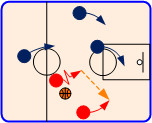
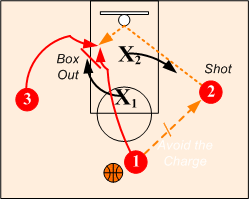
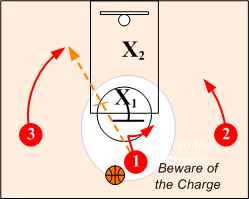
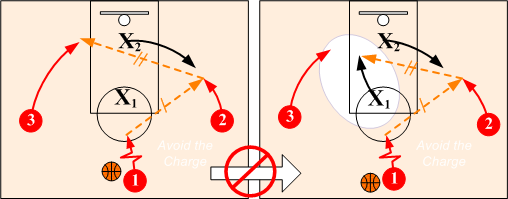
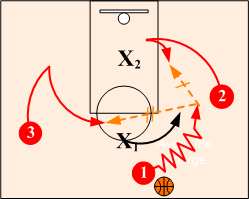
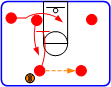
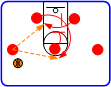
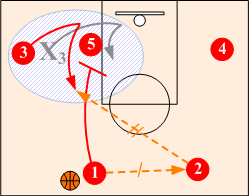
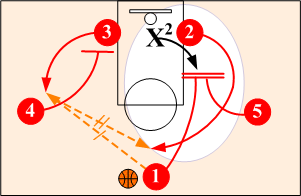
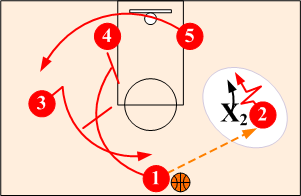
Two-on-One Situation
Main Objective: Lay up shot and steal
On any 2-on-1 situation, it is important to attack the basket and obtain a layup. The ball should be advanced by passing between players with little or no dribbling. This will allow the ball to get down the court faster and prevent the defender from focusing on just one player. Once in the scoring area, players should be alert to read and counter the defender's action.
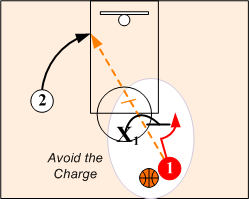
Finishing (Drive). Anytime the defender steps out to attack the passing lane, the player with the ball should put it on the floor and drive to the basket. A fake pass is a good ploy to use in this situation. A good fake will draw the defender out into the passing lane leaving the basket unprotected.
Avoid the Charge. The passer, after making a pass, must always be alert to stop and avoid charging into the defender.
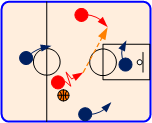
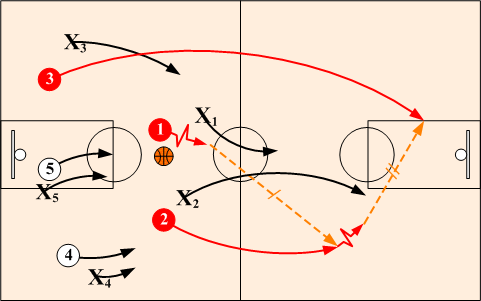
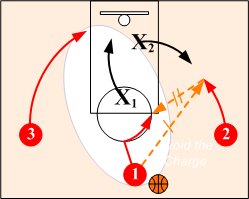
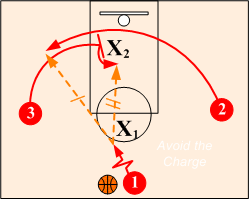
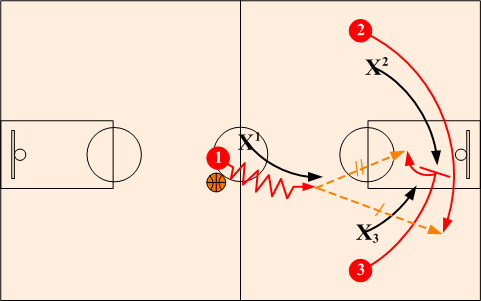
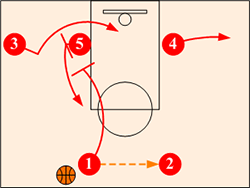
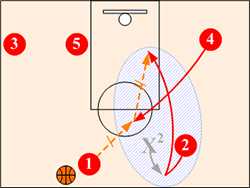
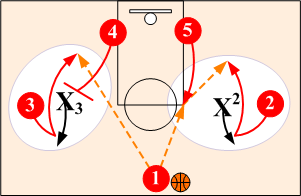
Three-on-One Situation
Main Objective: To create a Two-on-One situation and obtain a layup shot
If at all possible, on a 3-on-1 situation the offensive players should immediately try to create a break away or a two on one situation by passing the ball ahead. Otherwise, the defender will just take a defensive position near the basket and force a jump shot.
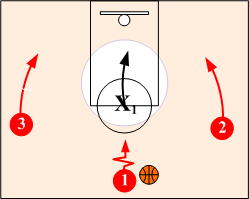
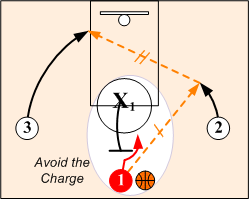
Defensive Sag. On most three on one situations, the defender will drop back to the and protect the basket forcing a jump shot. To prevent this from happening, the ball should be passed ahead creating a 2 on 1 situation for a layup shot.
Avoid the Charge. Another defensive ploy, on a a three on one situation, is for the defender to take a charge. Therefore, on a break, the passer must always be alert to stop and avoid charging into the defender after making a pass.
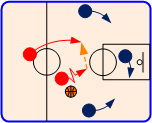
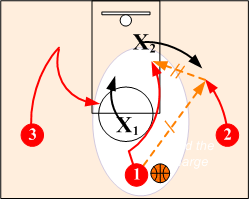
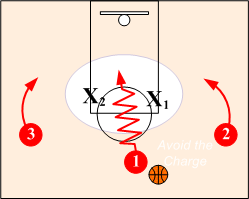
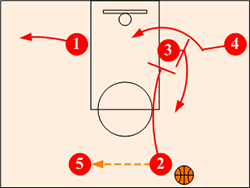
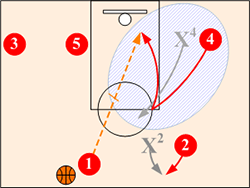
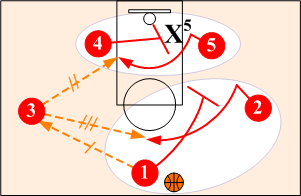
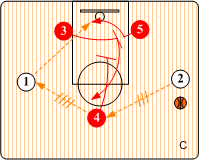
Three-on-Two Situation
Main Objective: Open jump shot and putback (on miss)
Pass Ahead: On a three on two situation, whenever possible pass the ball ahead and try to create a 2 on 1 situation for a layup shot.
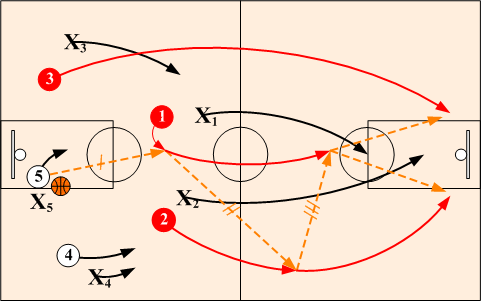
Take the Open Shot: On 3-on-2 situations, unless the defense is extremely poor or has a breakdown, a layup shot will not be feasible. Therefore, the offense should be content with taking an open jump shot and taking real advantage of the out numbered situation to rebound any missed shot.
Rebound. When the ball is passed to a wing for an open shot, the point and the opposite wing should both box out the lone weakside defender. Boxing out the defender should create an easy putback if the shot is missed.
Avoid the Charge. The passer, after making a pass, must always be alert to stop and avoid charging into the defender.
Three-on-Two Options
Wing to Wing Pass. Use extreme caution on a wing to wing pass. Although it looks like the receiver is open for a layup or easy shot, the top defender will be dropping down anticipating the pass. To be successful, the wing to wing pass must be made quickly, before the defender can drop, and be crisp.
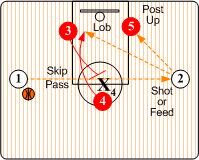
Return Pass to Middle
Since the top defender drops to the basket, a return pass to the point O1 is usually wide open. The O1 then has the option of shooting or passing to O3 for an easy shot, if/when the defender X1 rushes out to defend against the shot.
Give & Go Cut
If/when the defender X1 plays to the inside of O1, O1 after making a pass to wing O2 makes a basket cut. O2 looks to feed O1 on "Give and Go" cut or pass to O3 breaking into the free throw area.
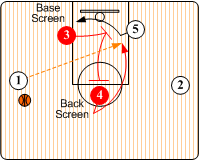
Down Screen
The point O1, after making a pass to wing, has option of setting a down screen for shooter O3.
Dribble Clear
The point O1 takes ball to wing on dribble. O2 back cuts and then posts up. O1 looks to feed O2 on back cut or post up or to pass to O3 breaking into the free throw area. O3 has option of shooting an open shot or feeding O2 if defender X2 fronts the post up.
Base Screen (Turn Out)
Wing O3 sets a base screen for O2 crossing under the basket. O1 looks to pass to O2 for open jumper or to O3 inside.
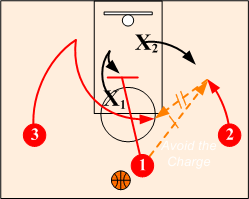
Split the Defense
On a 3-on-2 situation, anytime the two defenders play side by side, the point O1 should split them and drive hard to the basket. This will result in a layup or reaching foul or both.
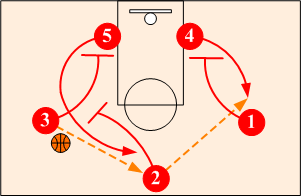
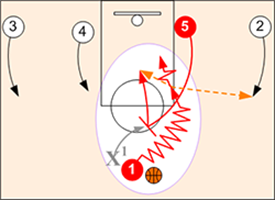
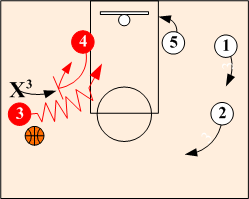
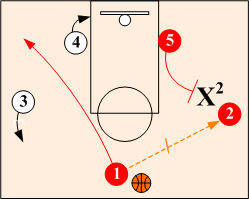
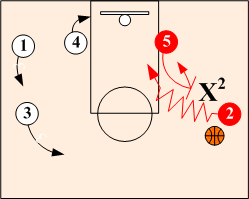
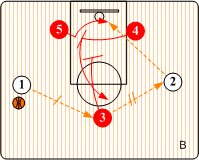
Three-on-Three Situation
Main Objective: Create a 3-on-2 situation or flow into 3-on-3 Turn Out
On a 3-on-3 situation, whenever possible, the ball handler should try to drive past the middle defender and create a 3-on-2 situation. See previous "Attacking the 3-on-2 Situations" for details.
"Turn Out" - Three-on-Three Attack
When the ball handler is unable beat the middle defender, O1 keeps the pressure on the defense by dribbling toward the side of the biggest wing player in this case O3. Wing O3 executes a solid base screen for wing O2 crossing under the basket to ball side. O1 looks to feed O2 for quick jumper or to O3 posting up against the smaller defender X2 if the defense switches. If neither of these quick hitters are available the O1 looks to flow directly into the predetermined early.
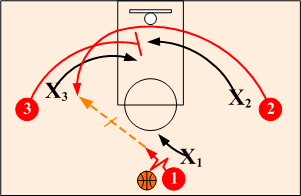
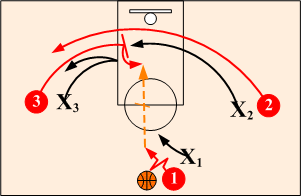
Quick Turn Out. Point O1 dribble clears Wing O3. O3 sets a base screen with wing O2 crossing under the basket to ball side. O1 looks to feed O2 for shot. O1 also has option of driving or pulling up for jumper.
Post Up. If/when the defense "Shows & Recovers" or switches, O1 looks to feed O3 stepping through inside off base screen.
GOOD RULE: Always Keep dribble alive. Only end dribble with shot or pass.
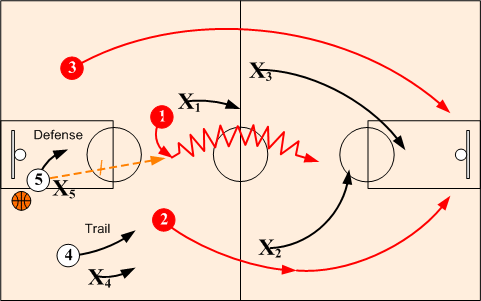
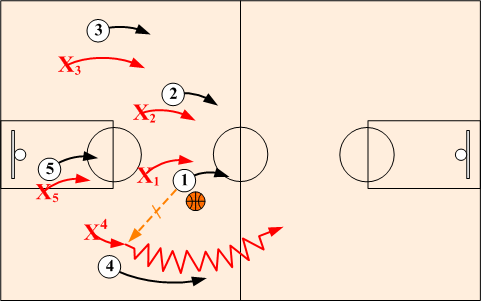
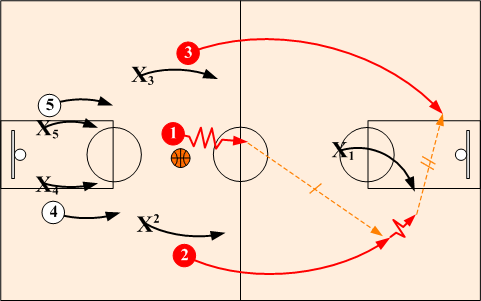
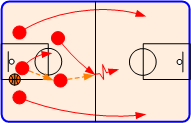
Proven Fast Break Attacks
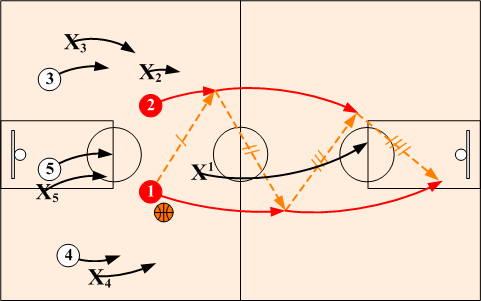
Most early offenses depend on quick, wide lane releases, inbound pass, and pass advance to reach the offensive operating areas before all of the defenders can retreat into the front court area. The lanes are broken down into wings, middle, trailer, and push. After initial lanes are denied by good defensive transition or poor offensive run outs, or slow inbound or outlet passes, then the "flow" becomes of the utmost importance in taking the initiative away from the defensive team. Here are three proven fast break attacks:
Click on desired Fast Break Offense below to view graphically Illustrated play details.


Phase 2: Early Flow
Secondary Break Actions
When the initial transition push does not create a good shot or an advantage, it is important to move directly into an early offensive flow without allowing the defense to set up. This Early Flow prevents the necessity of the offensive team to bring the ball back out before executing a set play which would allow the defense to get its players into their planned areas of defensive attack. This can be seen in so many modern offenses. The precious seconds it takes to back the ball out, allows the defense to regain the initiative, and employ all of their defensive weapons. The constant attack of "flow action" keeps the defense at a disadvantage.
Early offense is flexible. It allows for the game within a game to take place at all times. It is designed so that players can take advantage of any isolations, two man game or three man game situations as they occur. We hope to show many "flow" actions, which also can be used as half court offense when/if early pushes are not available. "Flow" actions are actually half court offenses executed without having to back the ball out to initiate a set play. If a coach chooses to call off or slow down early pushes, because of fatigue or personnel reasons, then the offensive "flow" actions become the teams half court set offenses.
Proven Early Offenses Flow Sets (64)
When the initial transition passing lanes and dribble penetration is denied, the offensive team should move directly into their set offense without bringing the ball back out before executing a set play which would allow the defense to get set. The following are proven early flow actions we have amassed over the years. These sets can be ran to either side of the court depending on player strengths and weaknesses. However, keep in mind it is their execution and spacing that makes them successful.
| Indexed by Go to Players | Indexed by Screen Actions |
Early Flow Offenses
Indexed By "Go To" Player Position
Early Flow Offenses
Indexed by Primary Screen ActionsOn Ball Screens
Corner Roll
Double Sides
Double Sides Pop
Base Opposite
Boston LobOff Ball Screens
Isolations
Related Links:
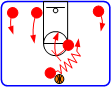
Phase 3: Continuity
The third and final phase of the early offense involves flowing into a continuity style of play. Flowing directly into a continuity pattern without hesitation continues to prevent the defense to get set up and organized. Continuity prevents any panic or rushed shots as the shot clock winds down while allowing for the ball to get into the player's hands you want to have handling the ball and taking the shots at the end. Continuity also maintains court balance with good offensive rebounding position and 2nd efforts to take place.
Click on desired continuity below to view graphically Illustrated play details.

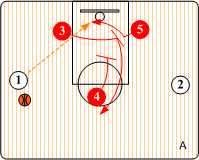
Flex Continuity
The Flex continuity is a powerful screening game utilizing strong baseline and down screens. The continuous "Pick the Picker" screening action puts a tremendous burden on the defense by having to defend two different types of screens simultaneously. Teams that exhibit good patience will surely create open shots. The Flex continuity also provides strong offensive rebounding and second efforts by constantly having two rebounders on the weakside.
Basic Rotation
O1 passes across to O2 as O5 steps out to corner initiating "Pick the Picker" action. O3 comes off O4's baseline screen and O1 screens down for O4. O2's options are to shoot, feed O3 on baseline cut, pass to O5 in corner or hit O4 popping out off O1's down screen.
Ball Reversal
If/when O2 passes to O4, O1 steps out to corner, and O5 comes off O3's baseline screen. O2 then down screens for O3 on weakside completing the "Pick the Picker" action. If/when O4 passes to O3 the flex continuity repeats.
Corner Pass - Post Feed
If/when ball is passed to corner, O1 can either screen across for O2 or cut to the basket over O5's back screen. Corner O3 looks to shoot or feed O4 posting up or lob pass to O1.
Bump Back
If/when O3's defensive player X3 anticipates the baseline cut and cheats below post screen early, O3 starts baseline cut, but bumps back off O1's and O4's double screen for shot.
Back Cut Against Overplay
When O1 tries to pass across to O2 and O2 is being overplayed by defender X2, O5 breaking high and receives pass directly from O1. O2 back cuts to the basket for the back door feed from O5. O1 follows pass for two game action with O5 if back door cut is not available. O5 also has option of setting a back screen for O2 initiating a direct over the top lob pass from O1.
Weakside Lob
When O5 flashes to high post and the pass is denied by defender X5, O5 immediately back cuts to basket looking for an over the top pass from O1.
Passing Game Continuity
The passing game or motion continuity is designed for a team of smaller, quicker players that are very athletic. The five player continuous movement opens up the middle for penetration and cuts. The passing game allows for a lot on individual offensive freedom. Since there is no precise structure, player movement is very unpredictable and difficult to defend.
The passing game takes advantage of sagging type defense. Most of the shots will be face up, medium range created by setting down and base screens. There is very little posting up in the passing game. The middle is purposely kept open for drives and cuts to the basket. Any posting up that does occur is usually comes after a player sets a screen. Since shooters will most often receive the ball going away from the basket, offensive rebounding can be a problem. Offensive rebounding responsibilities and techniques must be stressed and practiced.
Basic Action - Down Screens
O4 and O5 set down screens for shooters O3 and O2 on baseline. Ball handler O1 has option of feeding O2 or O3 coming off the down screens or O4 and O5 posting up if the defense should switch.
Basic Action - Screen Away
When wing O3 receives pass from point O1, O1 and O4 screen away. Wing O3 looks to feed O5 low or shooter O2 at the top of the circle.
Ball Reversal - Repeat Down Screens
Any time the ball is passed out to the top of the circle, wings screen down. When the player at the point passes to wing, they set a screen for the opposite wing.
Double Screen Option
A double screen can be easily created at anytime by point passing to wing and screening down for opposite post with the wing.
Wing Isolation
A One-on-One wing isolations can be created at any time by the post clearing to opposite wing off O5's and O1's weakside double screen.
Back Door vs Wing Overplay
If/when wings are over played and the pass from the point is denied, the post breaks high and wing back cuts to the basket for a back door feed. Post also has option of setting a back screen on wing.
Mid Screen Continuity
The Mid Screen continuity is an on ball screen that provides for an array of quick hitting options. Since the action takes place in the center of the floor, with shooters spotting up on the wings, it takes away any helpside support making it very difficult to defend. It is best executed with a talented point guard.
Basic Action
Post O5 breaks high and sets an on ball screen to free up the point guard for dribble penetration. O1 drives hard off a high post screen. The point guard has the option of turning the corner for a drive to the basket or executing a pull up jumper if the defense goes below the screen. The point guard also has options of a drop pass to O5 rolling to the basket or kick out passes to the shooters spotting up on the wings.

Screen & Pop
When the screener O5 is a good outside shooter, O5 has the option of popping out off the screen instead of rolling to the basket.
Side Screen
Side Screen action can be used for continuity when an offensive play breaks down or to create a good shot as time winds down on the shot clock. Although it is a fairly simple looking play, it incorporates a magnitude of quick hitting options, which make it difficult to defend. The Side Screen action can be quickly initiated by just having a post step out and set an "ON" ball screen for the wing.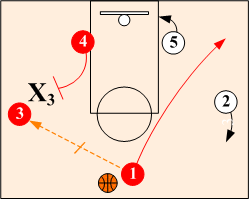
Basic Action (Left)
Point O1 passes to O3 on wing and clears to opposite corner. Post O4 steps out and sets an On-Ball screen for O3.
Reads & Options
O3 drives off O4's screen. When defender X3 trails over the screen, O3 drives to basket. If X3 goes behind O4's side screen, O3 pulls up for jump shot. If X3 and X4 should switch, O3 feeds O4 rolling to basket. If X3 and X4 trap O3, O3 should back out (string out) of trap and look for open player. O3 also has option of passing to O1 coming off O2's and O5's down weakside down screens.
Side Screen (Right)
Point O1 passes to O2 on wing and clears to opposite corner. Post O5 steps out and sets an On-Ball screen for O2.
Reads & Options
O2 drives off O5's screen. When defender X2 trails over the screen, O2 turns the corner and drives to basket. If X2 goes behind O5's side screen, O2 pulls up for jump shot. If X2 and X5 should switch, O2 feeds O5 rolling to basket. If X2 and X5 trap O2, O2 should back out (string out) of trap and look for open player. O2 also has option of passing to O1 coming off O3's and O4's down weakside down screens.
Inside Triangle Game
Since a lot of inside screening takes place, it is best run with physically strong players. The inside players should be good, but do not have to be dominating, since most of their shots will come off screens. Players must be well schooled in the fundamentals of setting and using screens. Placing good shooters on the wings will spread the defense, allowing the inside screening game to take place. A smaller player can be deployed inside to create mismatches if so desired. Triangle Game is easy to teach and learn.
Basic Continuity
To initiate action O3 screens across for O5, and then pops out to the top of the circle off of O4's down screen. O1 can shoot the ball, pass to O5 posting up, or pass to O3 stepping out to top of circle.
When O1 makes a reversal pass out to O3 and O3 passes to O2 on wing, O4 sets a baseline screen for O5. O3 after passing to O2 and sets a down screen for O4. Wing O2 has options of shooting if open, feeding O5 posting up or passing to O4 popping out off O3's down screen.
The Inside Triangle game's pick the picker continuity continues when O2 makes a reversal pass out to O4.
Back Screen Option
After setting a base screen for O5 or on any wing to wing skip passes, O3 has the option of stepping up and setting a back screen for a lob pass to O4.
Skip Pass Option
Wings have option of making a skip pass to the opposite wing at any time. When O1 makes a skip pass to O2, post O5 can either post up strong or set a base screen for O3. O3 can set a high back screen for O4 or O4 can down screens for O3, isolating O5 in the low post area.